Managing Players
Learn how to manage, monitor, and configure player devices that display your digital signage content.
Overview
Players are physical devices (computers, Android boxes, Raspberry Pi, LG/Samsung smart displays, etc.) that run the Castit player software to display content on screens. The Players section allows you to manage all connected player devices, monitor their status, configure settings, review proof-of-play reports, and troubleshoot issues.
Accessing Players
- Log in to your Castit account
- Click Players in the left sidebar navigation
- View all your paired players or start the pairing process
Player Pairing Overview
When you first access the Players section with no players paired, you'll see a guided setup:
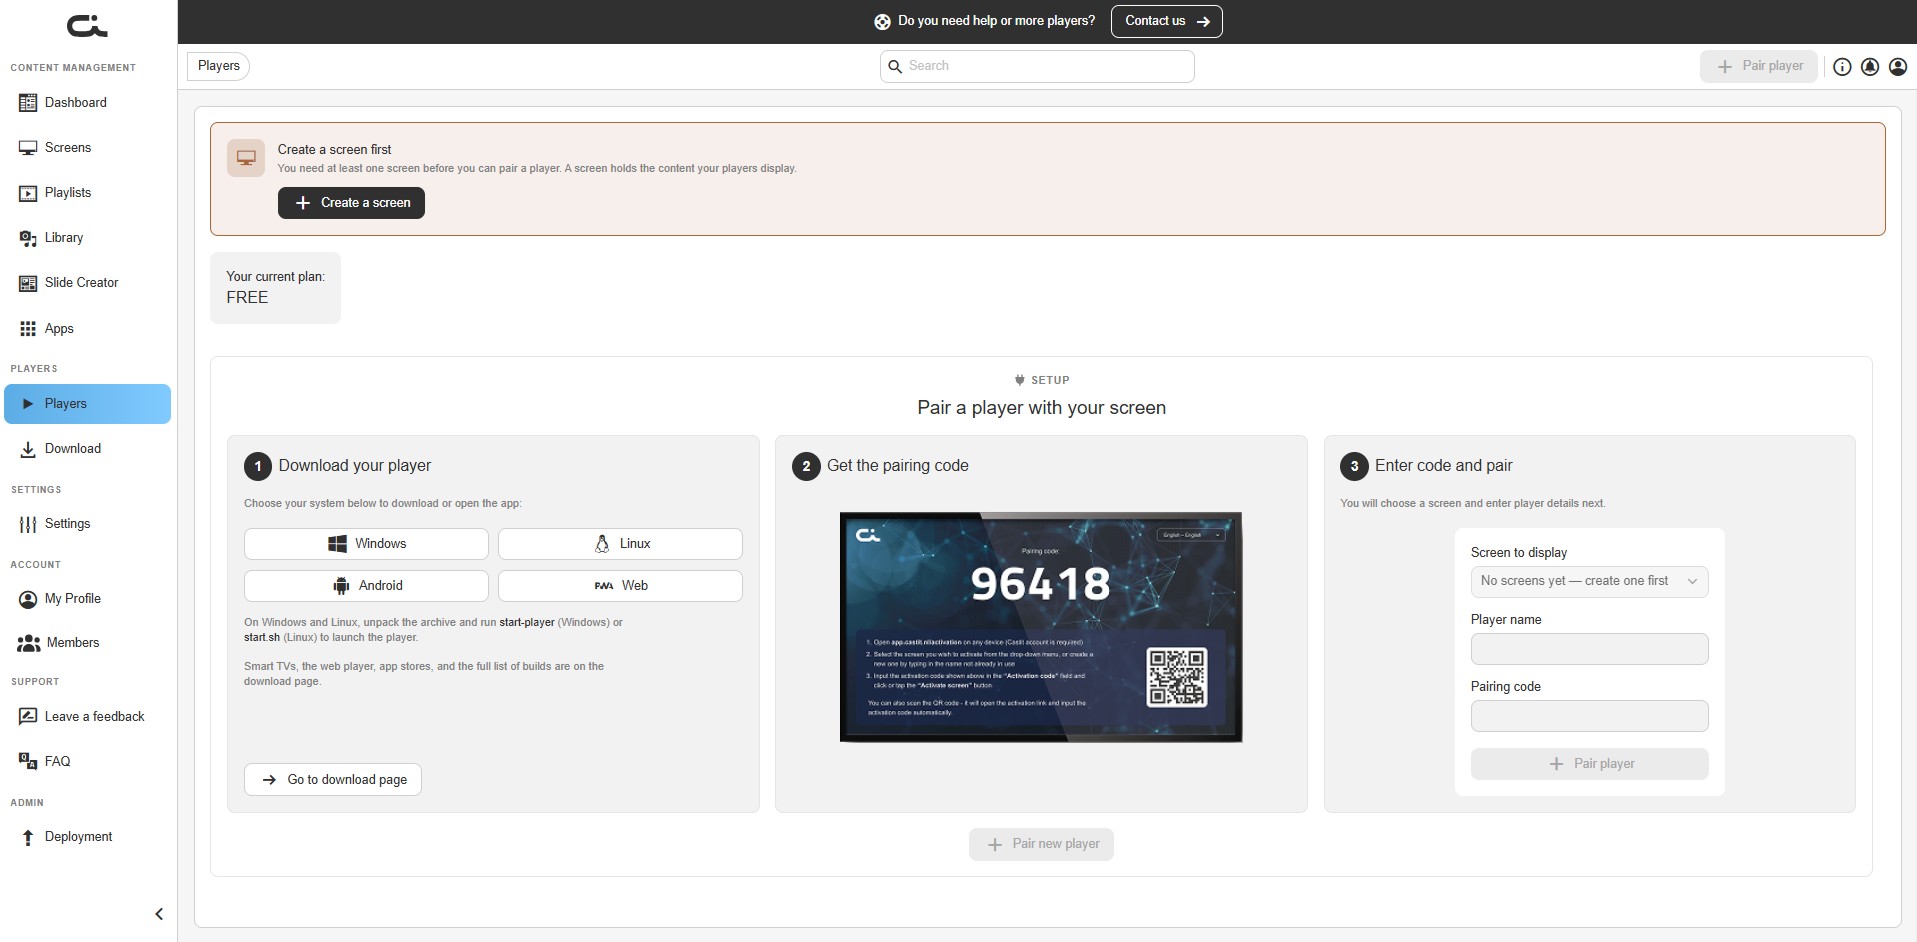
Create a Screen First
Before you can pair a player, you need at least one screen — a screen holds the content your players display. If you have no screens yet, a Create a screen first prompt appears at the top with a Create a screen button. Create your screen, then return to pair a player.
Three-Step Pairing Process
Below the prompt, a Pair a player with your screen panel walks you through three steps:
-
Download your player
- Choose your system to download or open the app: Windows, Linux, Android, or Web
- Smart TVs, the web player, app stores, and the full list of builds are on the download page — click Go to download page
- For step-by-step setup on each platform, see the Installation Guides
-
Get the pairing code
- A 5-digit code displays on your player device
- A QR code is also shown for quick scanning
-
Enter code and pair
- Choose a Screen to display, enter a Player name and the Pairing code
- Click Pair player to connect the player
For detailed pairing instructions, see the Pairing Players guide.
Players List View
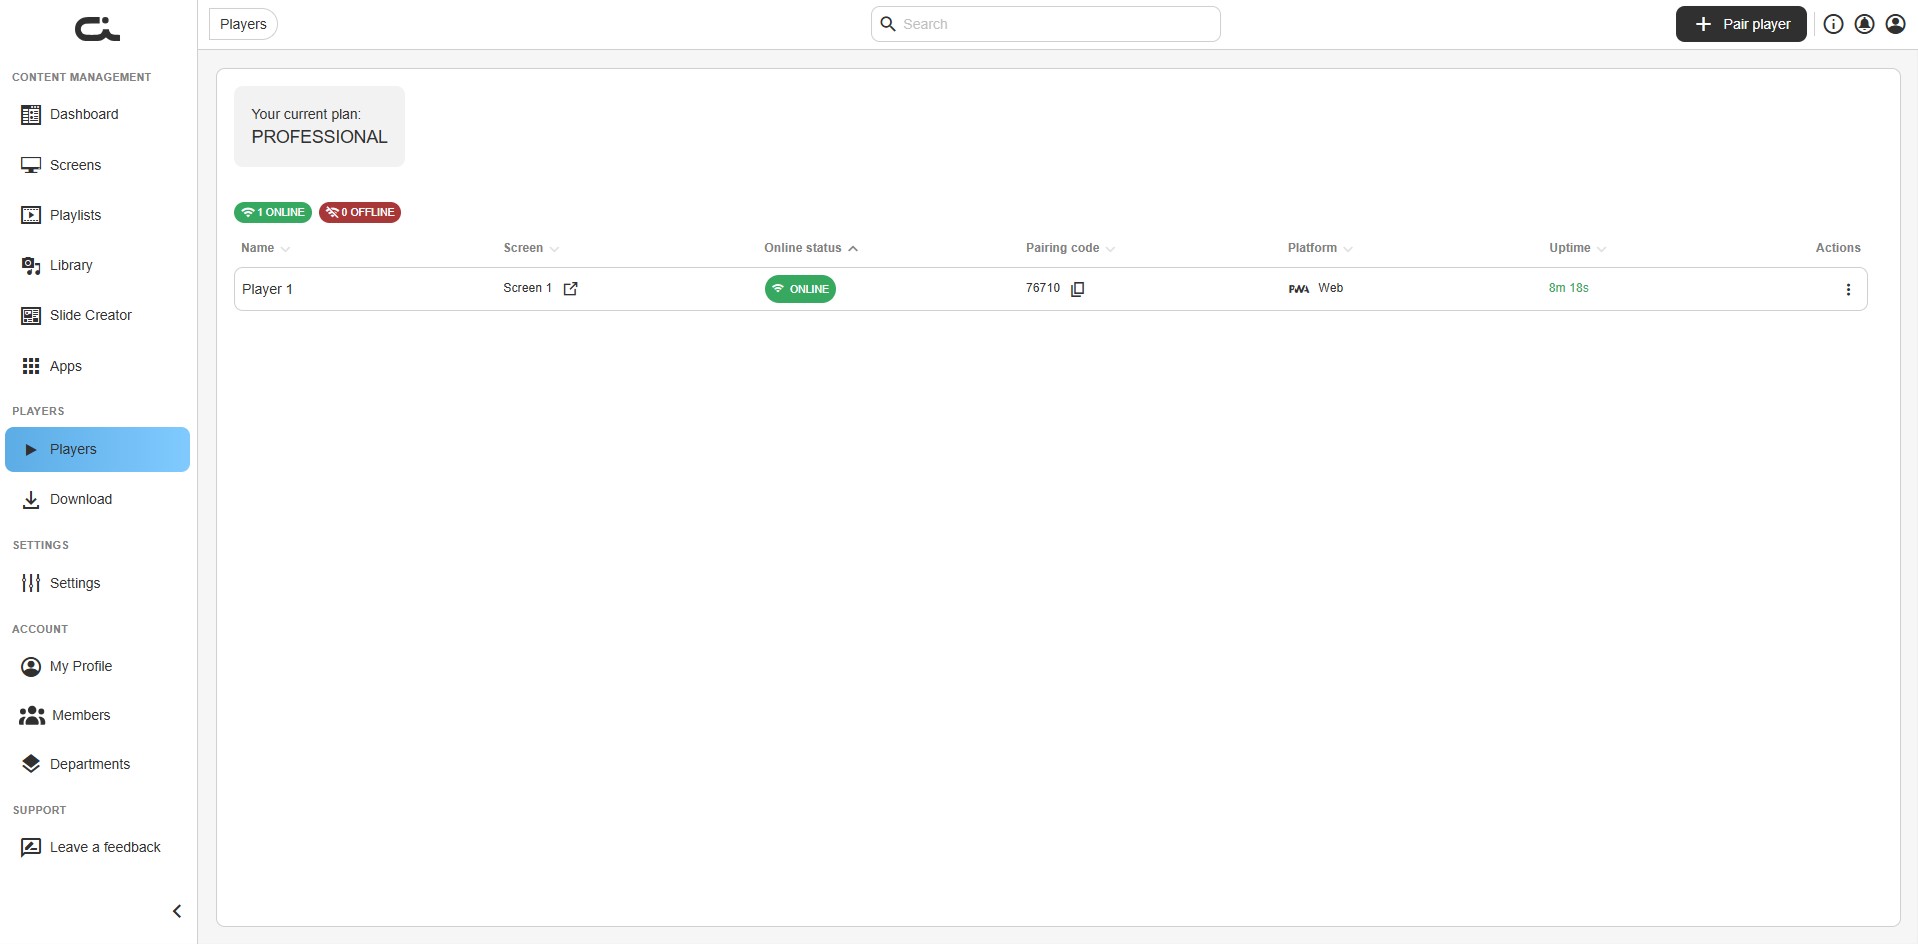
Once you have players paired, the Players page displays all your devices:
Status Filters
At the top of the page, quickly filter players by status:
- ONLINE (green badge): Shows count of online players
- OFFLINE (red badge): Shows count of offline players
Click these badges to filter the list accordingly.
Player Information Table
The table displays key information for each player:
| Column | Description |
|---|---|
| Name | Player name assigned during pairing |
| Screen | The screen this player is paired to; click the icon to open that screen |
| Online status | Current connection status (ONLINE badge in green or OFFLINE badge in red); sortable |
| Pairing code | Unique 5-digit code for this player, with a copy button |
| Platform | Operating system/platform (Windows, Linux, Android, Web/PWA, Raspberry Pi, LG webOS, Samsung Tizen) |
| Uptime | How long the player has been continuously online (e.g. "8m 18s") |
| Actions | A three-dot (⋮) menu with quick actions for the player |
Row Actions Menu
Click the ⋮ icon in the Actions column to open a quick menu for that player:
- Preview — open a preview of what the player is displaying
- Rename player — change the player's name
- Move player — move the player to a different screen
- Unpair — disconnect the player from its screen
Searching Players
Use the search bar at the top to find specific players by name.
Pairing a New Player
Starting the Pairing Process
- Click the Pair player button in the top right corner
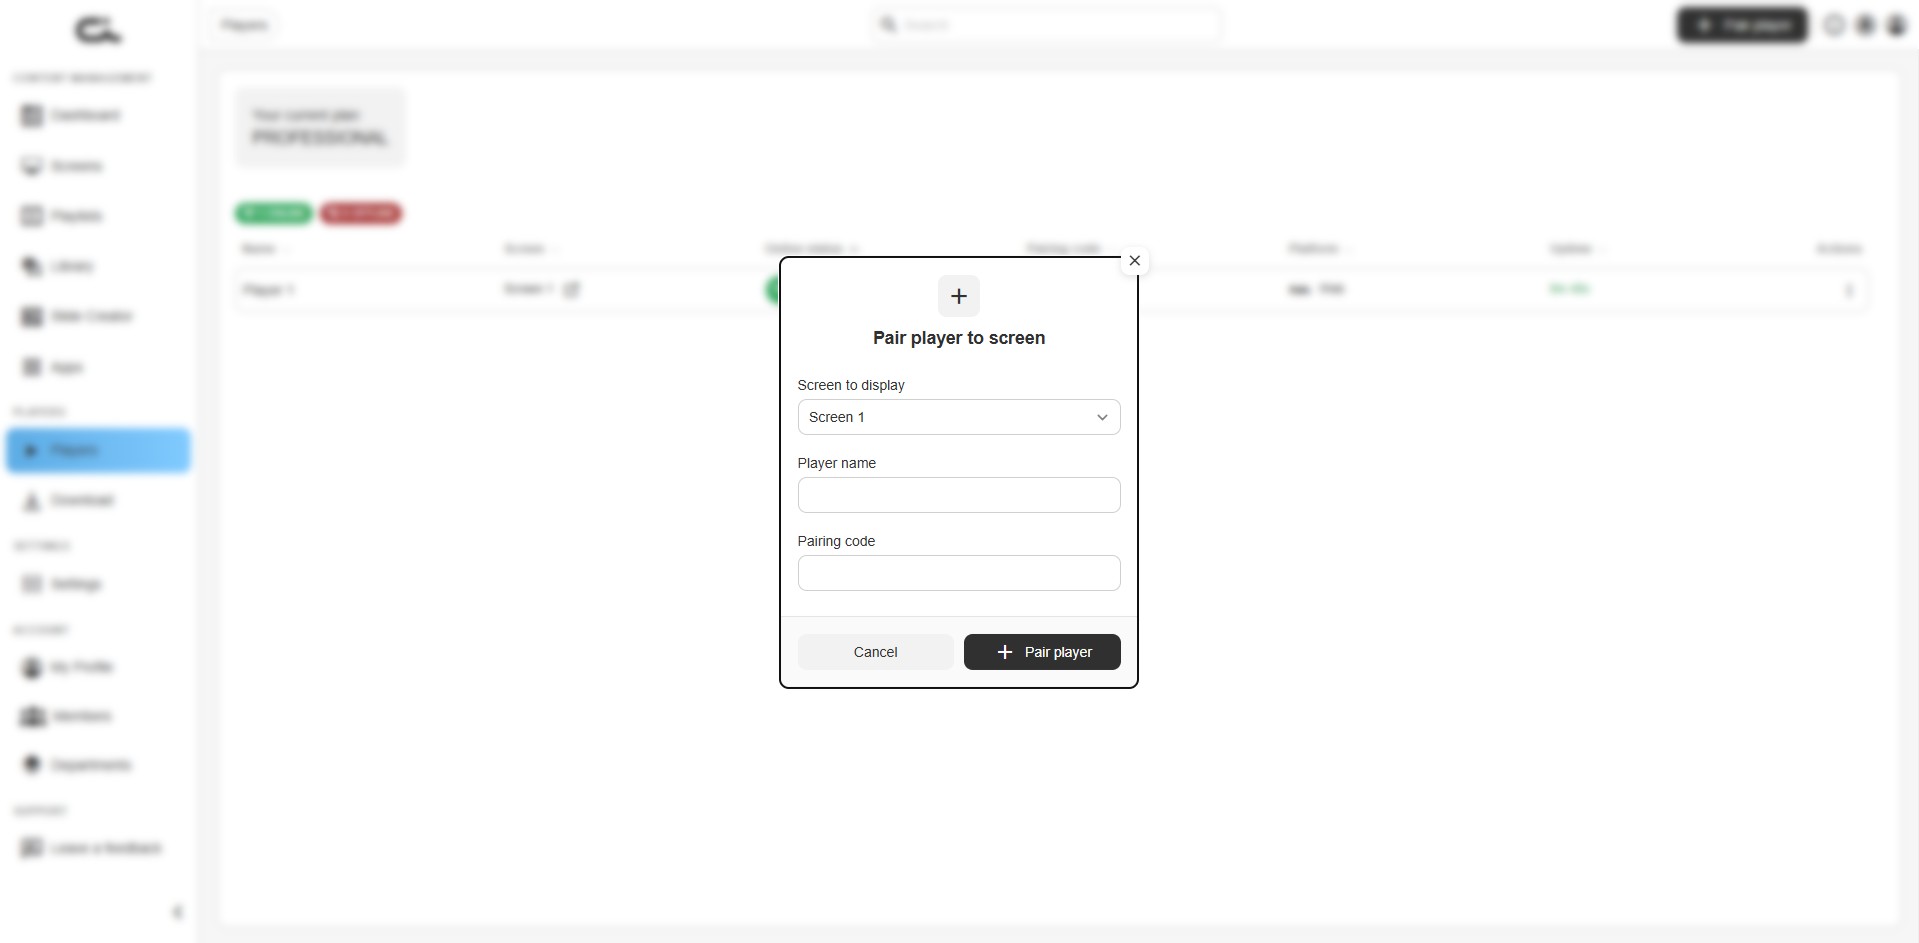
- The Pair player to screen dialog appears
Pairing Dialog Fields
Screen to display: Select which screen this player should display
- Choose from your existing screens
- This determines what content the player shows
Player name: Give your player a descriptive name
- Example: "My latest player", "Reception Display", "Lobby Screen Player"
- Use names that identify the location or purpose
Pairing code: Enter the 5-digit code displayed on the player device
- The code appears on the physical player when launched
- Must match exactly
Completing Pairing
- Fill in all required fields
- Click the Pair player button (or Cancel to close without pairing)
- The player connects to your screen
- Player appears in your players list with ONLINE status
Name your players based on physical location (e.g., "Reception - Main Entrance") to make them easy to identify when managing multiple devices.
Managing Individual Players
Click on any player in the list to access its detailed management page. The page opens on the Settings & Info tab and has six tabs in total: Settings & Info, Availability, Proof of Play, Report problem, Uptime, and Admin.
Top Action Buttons
The buttons at the top of every tab apply to the whole player:
- Broadcast — push an immediate content update to this player
- Move player — move the player to a different screen
- Unpair — remove the player from its screen (requires confirmation)
- Preview — open a preview of what's currently displaying
You can also rename the player using the edit (pencil) icon next to its name in the breadcrumb.
Settings & Info Tab
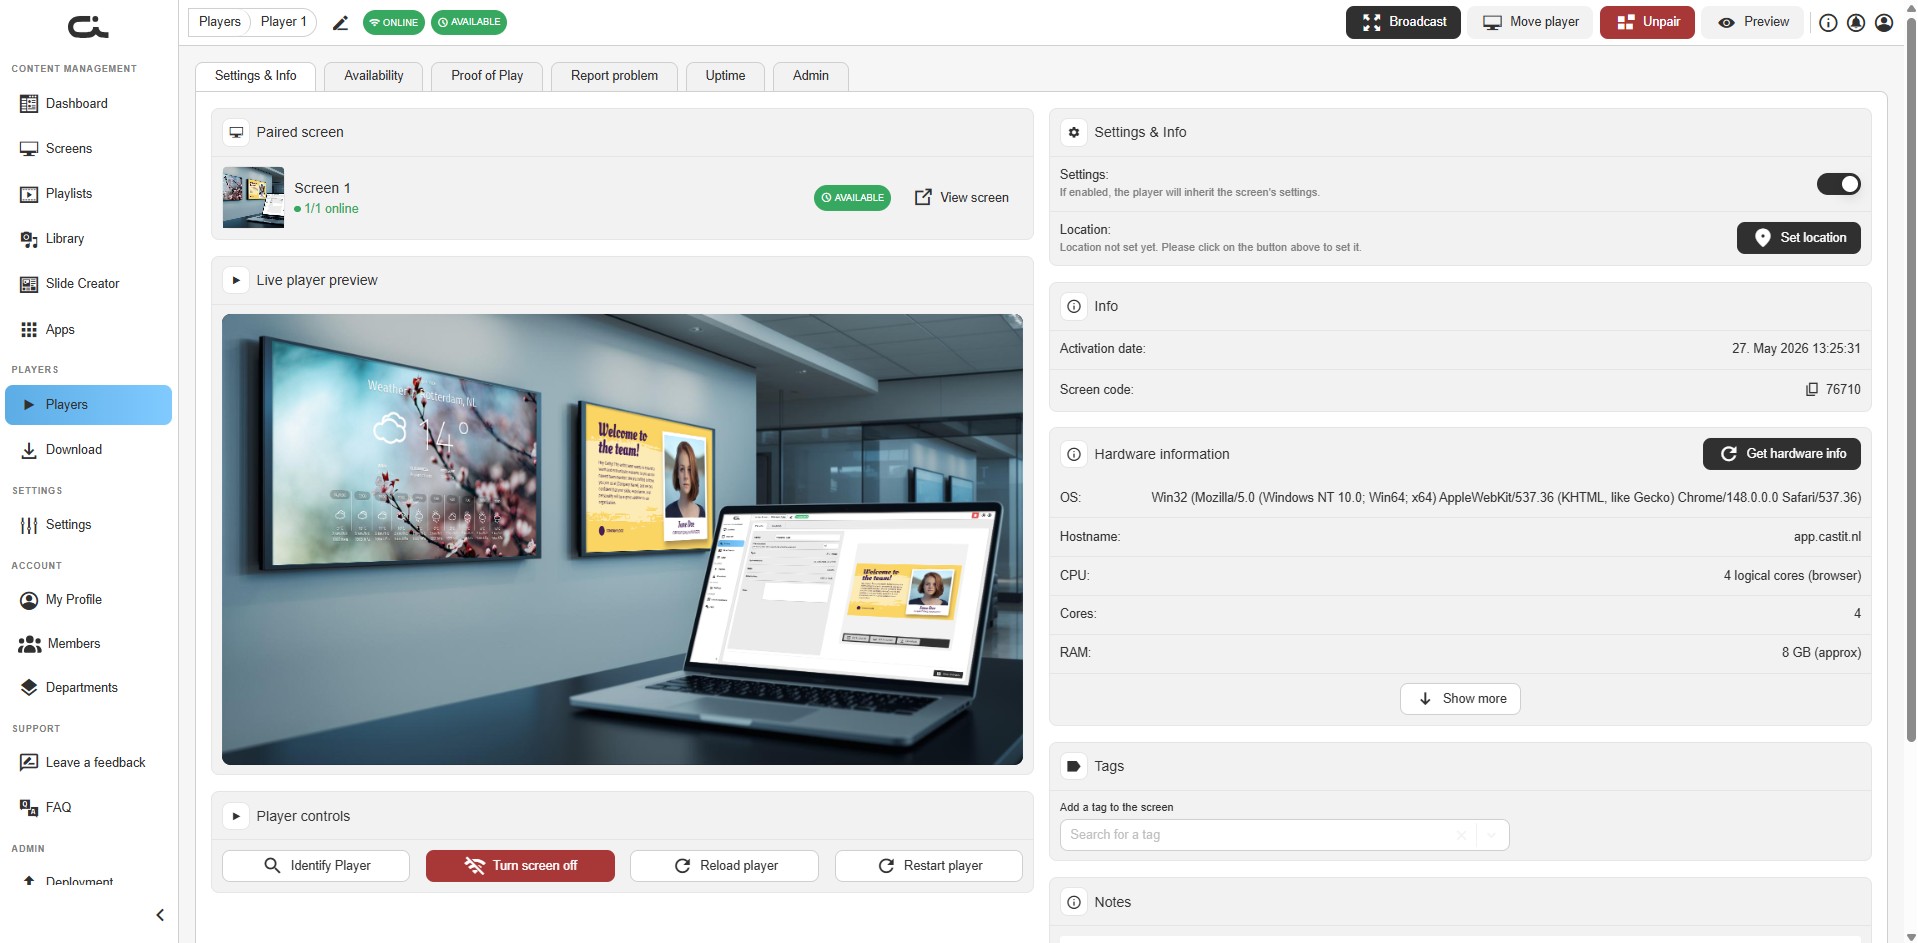
The Settings & Info tab provides comprehensive player information and configuration:
Paired Screen
Shows which screen is currently paired with this player:
- Screen thumbnail and name
- Online count (e.g. "1/1 online") and an AVAILABLE badge
- Click View screen to open the paired screen
Live Player Preview
See exactly what's currently displaying on this player in real-time:
- Full preview of the active content
- Updates automatically as content changes
- Useful for verifying content without physical access to the display
Player Controls
Send commands directly to the player:
- Identify Player — show an on-screen marker so you can identify which physical display this player is
- Turn screen off — power the physical display off (where supported)
- Reload player — reload the player's current content
- Restart player — restart the player application
Settings & Info Panel
Settings Toggle
- Controls whether the player inherits the screen's settings
- When enabled: Player uses the screen's configuration automatically
- When disabled: Player can have custom settings
Location
- Physical address of where the player is installed
- Click Set location to open a Choose a location map dialog — search for a location or drop a pin, then Save location
- Helps with maintenance and management
The availability inheritance toggle has moved to its own Availability tab (see below); it's no longer on this panel.
Info
Displays identification details:
- Activation date: When the player was first paired (e.g., "27. May 2026 13:25:31")
- Screen code: Unique pairing identifier (e.g., "76710"), with a copy button
Hardware Information
Click Get hardware info to retrieve technical details reported by the player. Click Show more to expand the full list:
- OS and Hostname
- CPU, Cores, and RAM
- GPU
- MAC Address
- Timezone and Device Time
- Screen resolution
- Network Type, Network Speed, and Network Assessment
This is useful for support and for verifying a device meets requirements. Some values show "N/A (browser)" on web/PWA players.
Tags
Organize players with custom tags:
- Search for existing tags or create new ones
- Use tags like "Lobby", "Floor 2", "Critical", "Test Device"
- Filter players by tags across your organization
Notes
Add notes about this player — physical location details, maintenance records, contact information, or anything relevant for your team. Click in the notes area and type to add or edit notes.
Availability Tab
Control when this player operates:
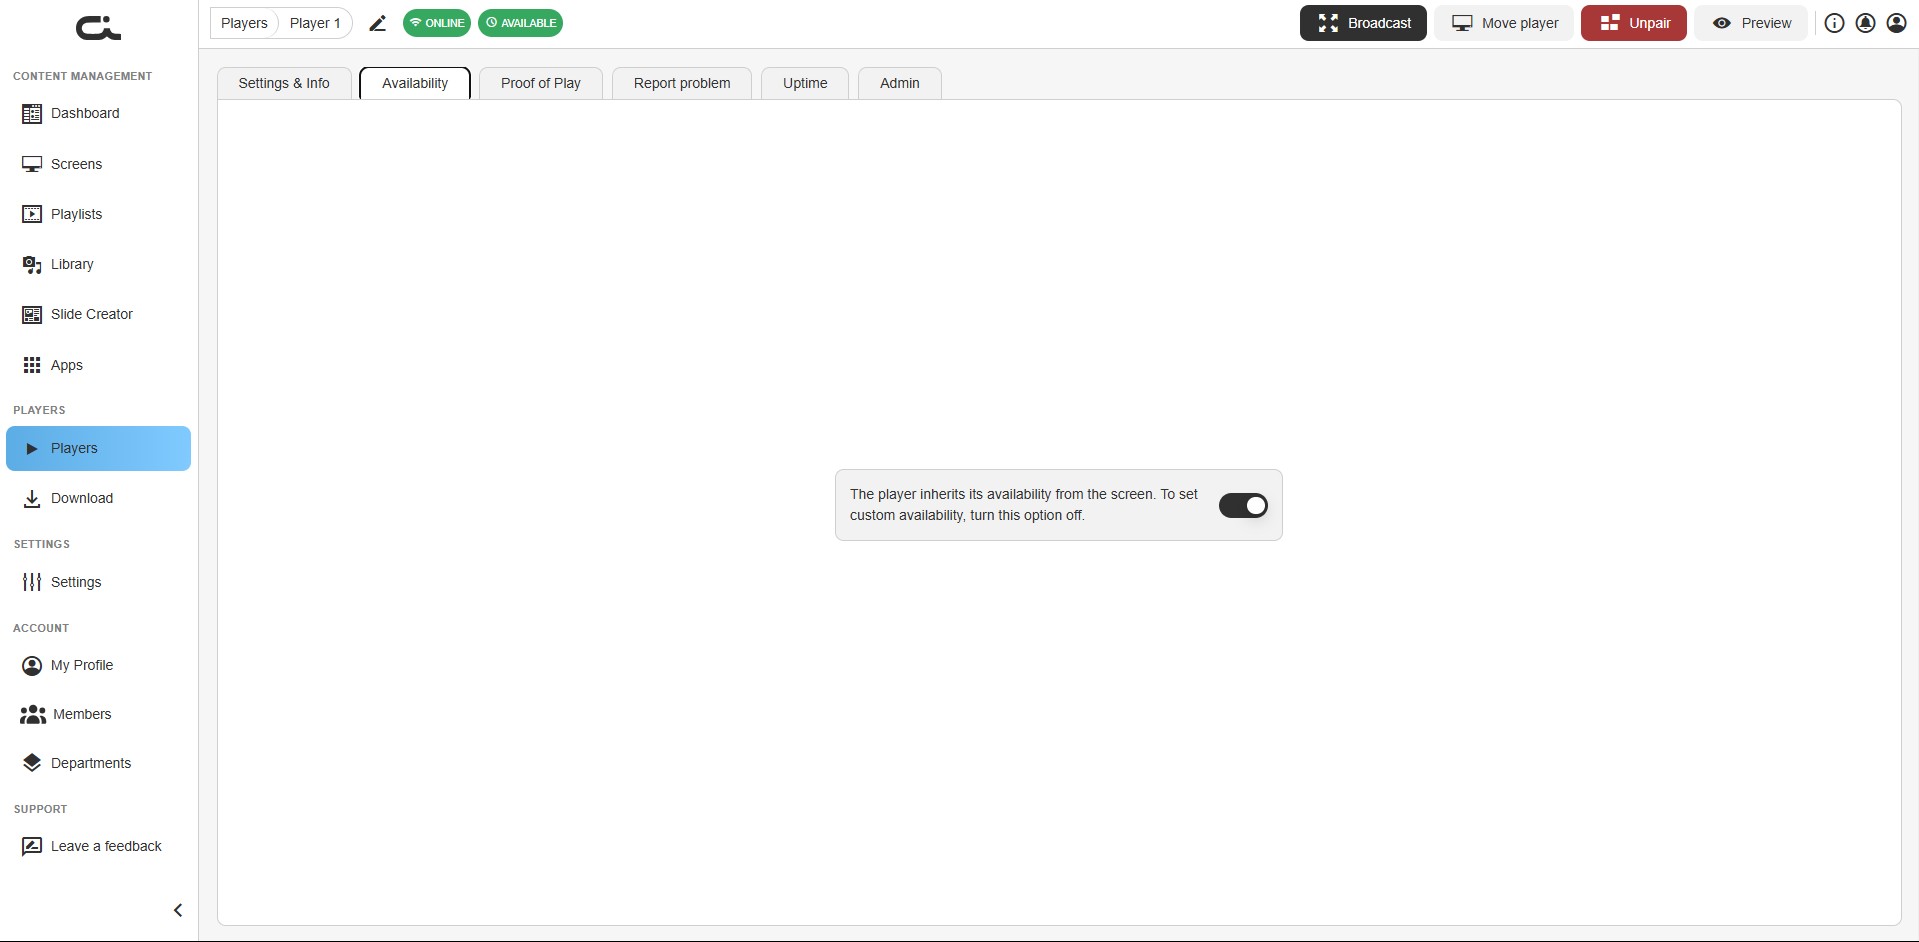
Inherited Availability
By default, a player inherits its availability from the paired screen:
- Message: "The player inherits its availability from the screen. To set custom availability, turn this option off."
- The player automatically follows the screen's schedule
- No additional configuration needed
Custom Availability
To set player-specific operating hours:
- Turn off the inherit toggle on this tab
- Configure a custom availability schedule for this player
Use cases for custom availability:
- Player in a location with different operating hours
- Temporary schedule changes without affecting the screen
- Energy savings for specific locations
- Maintenance windows
Proof of Play Tab
The Proof of Play tab reports exactly what content played on this player and for how long — useful for advertising verification and content audits.
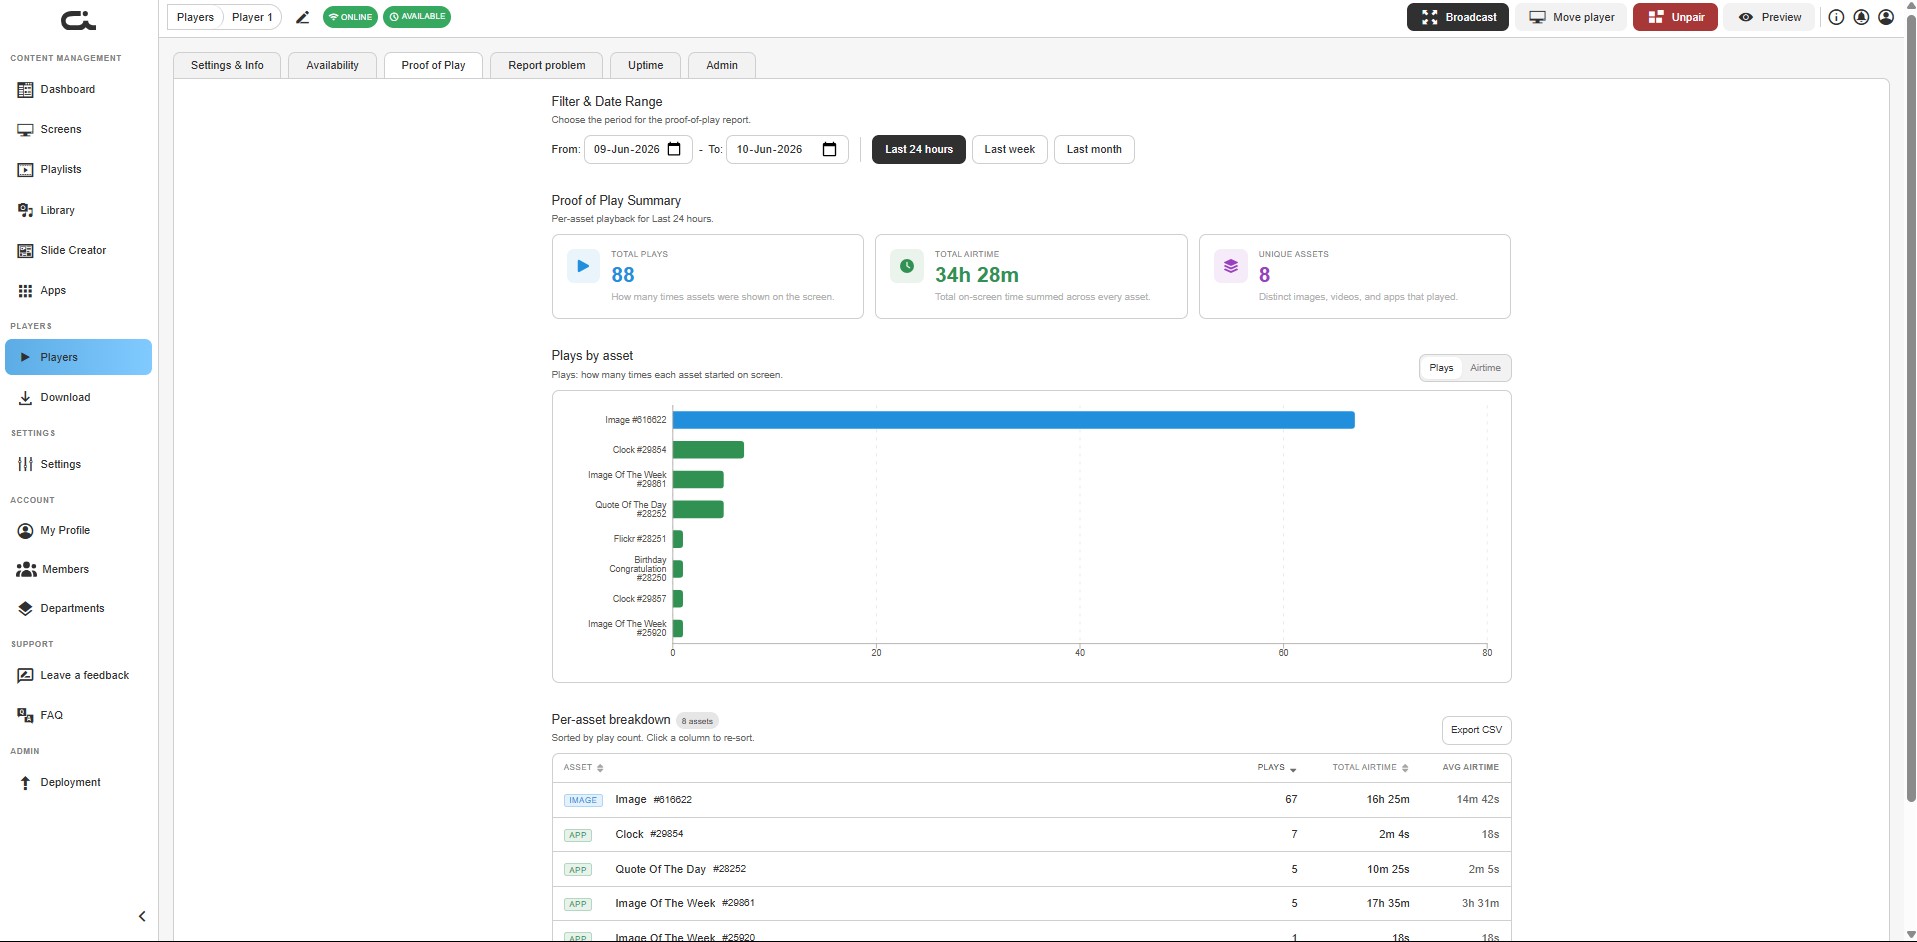
Filter & Date Range
Choose the reporting period using the From / To date pickers, or one of the quick presets: Last 24 hours, Last week, or Last month.
Proof of Play Summary
Summary cards for the selected period:
- Total plays — how many times assets were shown on the screen
- Total airtime — total on-screen time summed across every asset
- Unique assets — distinct images, videos, and apps that played
Plays by Asset
A horizontal bar chart of playback per asset. Use the Plays / Airtime toggle to switch between counting how many times each asset started and how long it was on screen.
Per-Asset Breakdown
A sortable table listing each asset with its Plays, Total airtime, and Avg airtime. Click a column to re-sort, and use Export CSV to download the report.
Uptime Tab
The Uptime tab shows the player's connectivity history over time, helping you spot recurring outages or unstable connections.
Admin Tab
The Admin tab holds advanced, administrative options for the player. The exact options depend on your account and platform.
Report Problem Tab
If you encounter issues with a player, use the Report problem feature:
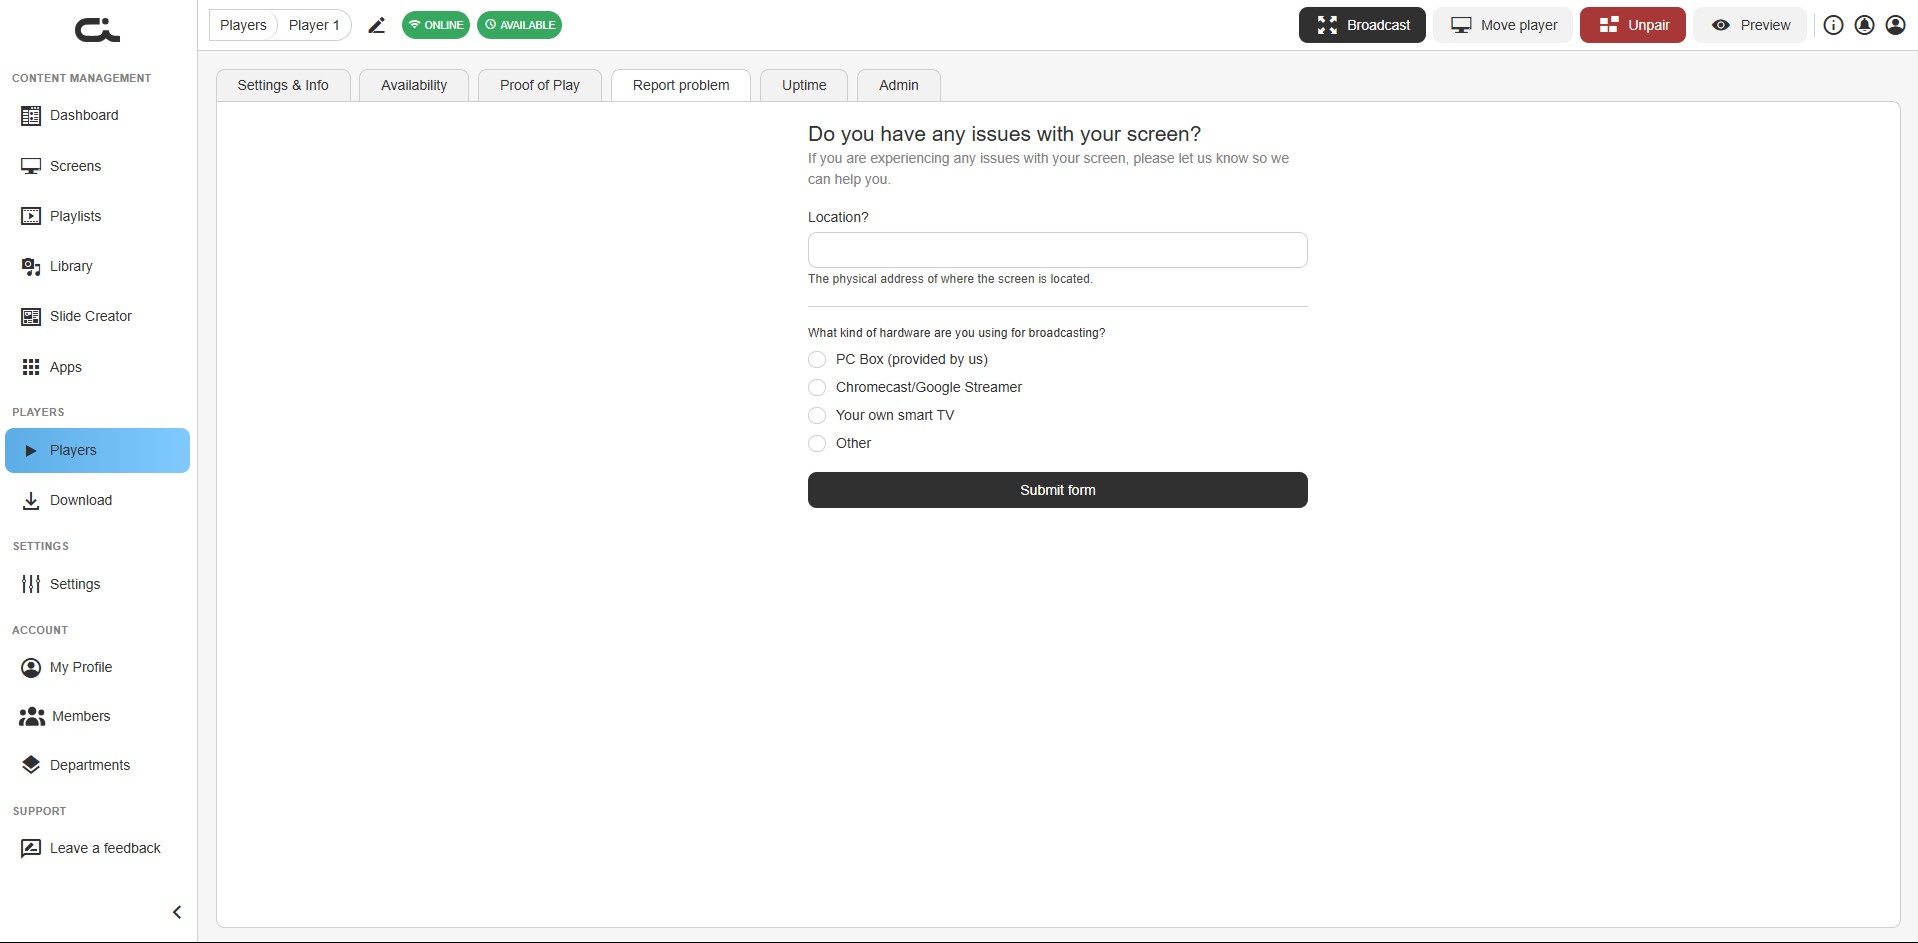
Problem Reporting Form
Question: "Do you have any issues with your screen?"
Explanation: "If you are experiencing any issues with your screen, please let us know so we can help you."
Location Field
- Enter the physical address where the screen is located
- Helps support team identify the specific installation
Hardware Type
Select the type of hardware you're using:
- PC Box (provided by us): Castit-provided player hardware
- Chromecast/Google Streamer: Google Cast devices
- Your own smart TV: Smart TV with built-in player
- Other: Other hardware configurations
Submit Form
Click the Submit form button to send your problem report to support.
Provide detailed information about the issue, including:
- When the problem started
- What you've tried to resolve it
- Error messages if any
- Impact on your operations
Player Status Management
Online Players
Players showing ONLINE status are:
- Connected to the internet
- Communicating with Castit servers
- Ready to receive content updates
- Actively displaying assigned content
Offline Players
Players showing OFFLINE status may be:
- Powered off
- Disconnected from the internet
- Player software not running
- Network issues
Troubleshooting Offline Players
- Check physical connections: Power, HDMI, network cables
- Verify internet: Test network connectivity
- Restart player software: Use Restart player in the Settings & Info tab's Player controls, or relaunch the Castit player application
- Reboot device: Power cycle the player hardware
- Check firewall: Ensure Castit servers aren't blocked
- Use Report problem: Submit a support ticket if issues persist
Broadcasting Content
The Broadcast button allows you to:
- Force immediate content refresh
- Push updates without waiting for sync interval
- Verify content changes appear correctly
- Troubleshoot display issues
When to use Broadcast:
- After making content changes that need to appear immediately
- Testing new content
- Resolving sync issues
- Verifying player connectivity
Unpairing Players
To disconnect a player from a screen:
- Open the player's detail page
- Click Unpair in the top action bar
- Confirm the action
What happens when unpairing:
- Player disconnects from the screen
- Content stops displaying on the player
- Player returns to pairing screen showing new code
- Player can be re-paired to same or different screen
Unpairing a player will interrupt content display. The physical device will show a pairing screen until re-paired with a screen.
Moving Players
To move a player to a different screen without unpairing and re-pairing it:
- Open the player's detail page and click Move player in the top action bar (or use Move player from the row's ⋮ Actions menu in the list)
- Choose the destination screen
- Confirm
The player keeps its identity and history but immediately starts displaying the new screen's content. Use this when you reorganize which content runs on which device.
Best Practices
Naming Convention
Use consistent naming for easy identification:
- Location-based: "Lobby Main Entrance", "Floor 2 Breakroom"
- Function-based: "Reception Display", "Product Showcase"
- Building-based: "Building A - Lobby", "HQ - Conference Room 1"
Regular Monitoring
- Check player status daily for critical displays
- Use status filters to quickly identify offline players
- Set up alerts for offline players (if available)
- Review player notes before maintenance
Organization with Tags
Create a tagging system:
- Location tags: "Downtown", "Headquarters", "Branch-12"
- Department tags: "Marketing", "HR", "Sales"
- Priority tags: "Critical", "Standard", "Test"
- Hardware tags: "PC-Box", "Android", "Web-Player"
Documentation
Keep notes updated with:
- Installation date and installer name
- Hardware specifications
- Network information (IP, MAC address)
- Maintenance history
- Known issues or quirks
- Emergency contact information
Availability Management
- Most players should inherit screen availability
- Use custom availability only when necessary
- Document reasons for custom schedules
- Review availability settings periodically
Troubleshooting Common Issues
Player Shows Online But No Content Displays
- Check if screen has content assigned
- Verify player is paired to correct screen
- Use Broadcast to force content refresh
- Check Live preview to see if content is loading
- Restart the player application
Pairing Code Not Accepted
- Verify all 5 digits are entered correctly
- Check player is still showing the code (not timed out)
- Restart player to generate new code
- Ensure player has internet connectivity
Content Out of Sync
- Click Broadcast to force immediate sync
- Check player's "Last seen" timestamp
- Verify network connection quality
- Review player storage space (for media files)
Settings Not Taking Effect
- Verify the Settings toggle is in the correct state (inherited vs custom)
- Save changes before navigating away
- Use Broadcast to push settings
- Use Restart player (Player controls) if settings still don't apply
Multiple Players on One Screen
You can pair multiple players to the same screen:
- All players display identical content
- Useful for multiple displays in same location
- Provides redundancy for critical displays
- Each player managed independently
To add additional players:
- Click Pair player
- Select the same screen
- Enter new player information
- Complete pairing
Current Plan Information
The Players page displays your current subscription plan:
- Your current plan: Shows plan name (e.g., "Essential")
- Plan determines number of players allowed
- Upgrade plan if you need more players
Getting Help
If you need assistance:
- Use the "Do you need help or more players?" button at the top
- Click Contact us! to reach support
- Use the Report problem tab for specific player issues
- Check FAQ in the left sidebar for common questions
Next Steps
- Pairing Players Guide - Detailed pairing instructions
- Screen Settings - Configure screen options
- Screen Availability - Set operating schedules
- Adding Content to Screens - Manage screen content