Screen Scheduling
Create time-based content schedules to automatically change what displays on your screen throughout the day.
What is Screen Scheduling?
Screen Scheduling allows you to:
- Display different content at different times
- Automate content changes throughout the day
- Show time-appropriate content
- Manage complex content rotations
Difference Between Availability and Schedule
It's important to understand the distinction:
Availability (Previous Tab)
- Controls when the screen is ON or OFF
- Determines operating hours
- Power management
- Screen active/inactive state
Schedule (This Tab)
- Controls what content displays when the screen is ON
- Changes content at specific times
- Time-based content rotation
- Assumes screen is already available/on
Both work together: Availability turns the screen on/off, Schedule changes what shows while it's on.
Accessing the Schedule
- Navigate to Screens in the left sidebar
- Open your screen
- Click the Schedule tab
Schedule Interface Overview
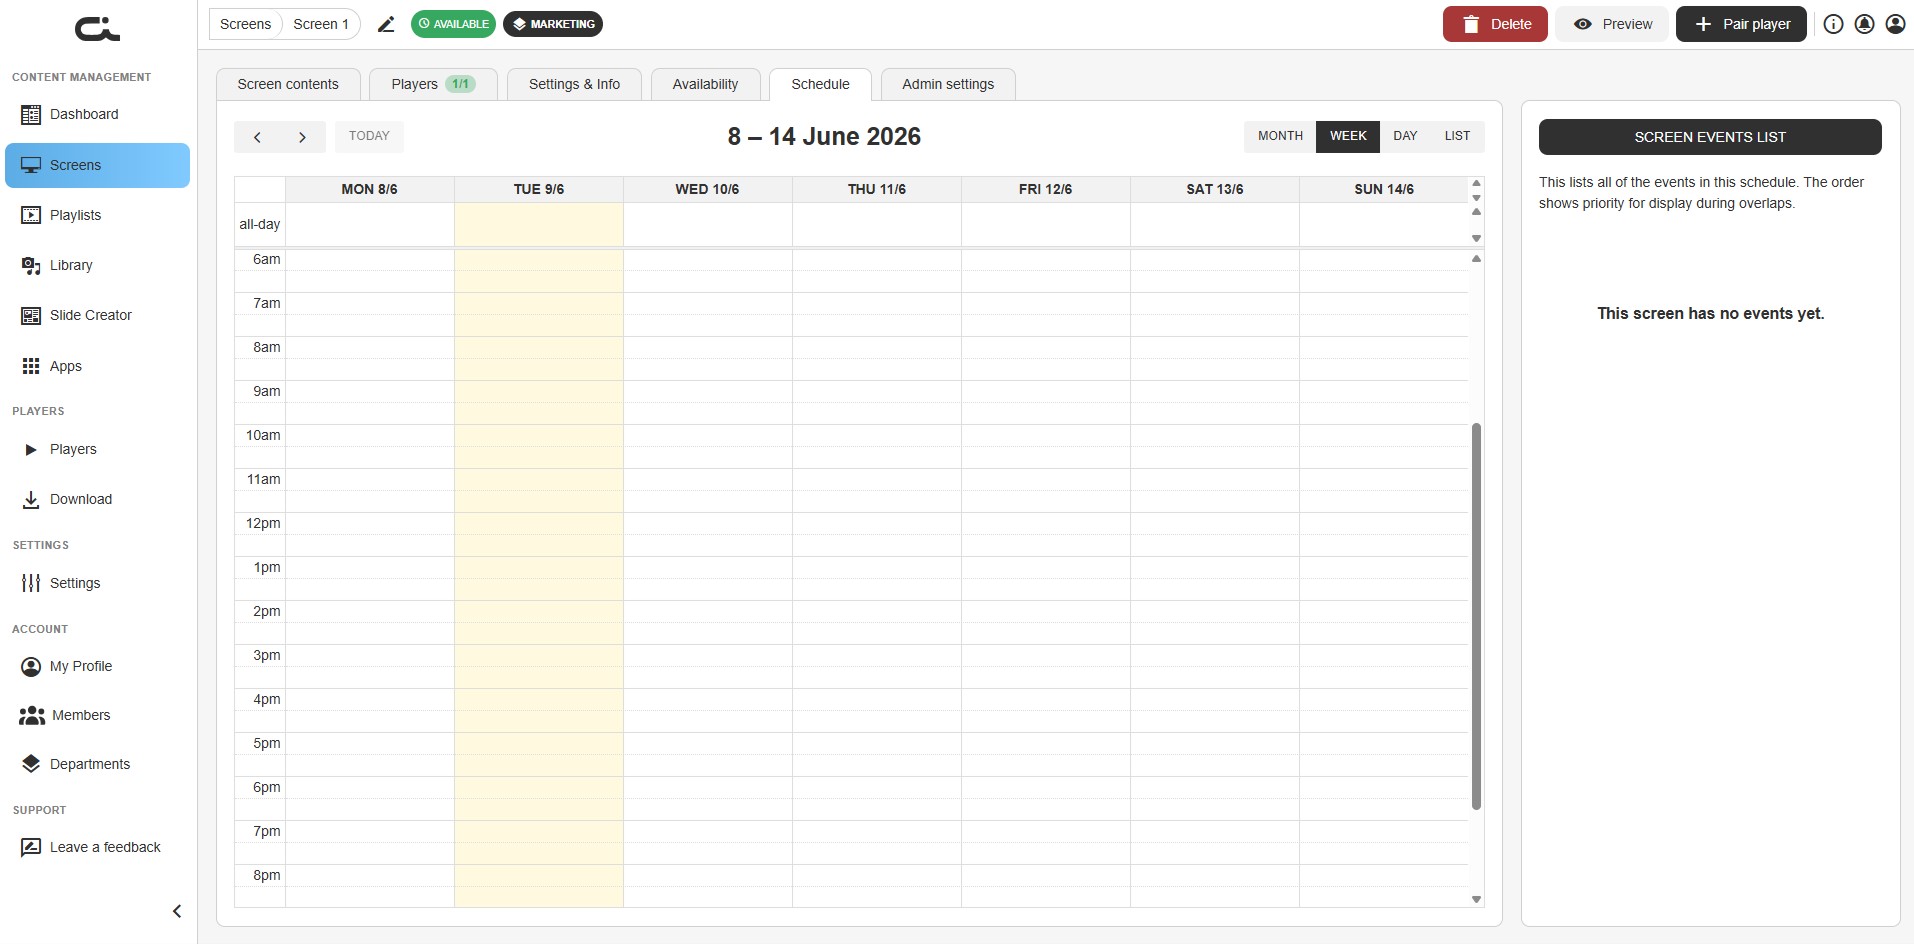
The Schedule tab displays a calendar-based scheduling interface.
View Options
Located at the top:
- Navigation arrows (‹ ›) - Move between periods
- TODAY button - Jump to current date
- Date range display - Shows the current view (e.g., "8 – 14 June 2026")
View Modes
Switch between different calendar views:
- MONTH - Monthly calendar overview
- WEEK - Weekly schedule grid (default)
- DAY - Single day detailed view
- LIST - List of all scheduled events
Calendar Grid
Weekly View displays:
- Days across the top - MON 8/6, TUE 9/6, WED 10/6, etc.
- Time slots down the left - Hourly
- All-day row at the top for full-day events
- Current day highlighted
Screen Events List
The right panel shows:
- The "SCREEN EVENTS LIST" heading
- Description: "This lists all of the events in this schedule. The order shows priority for display during overlaps."
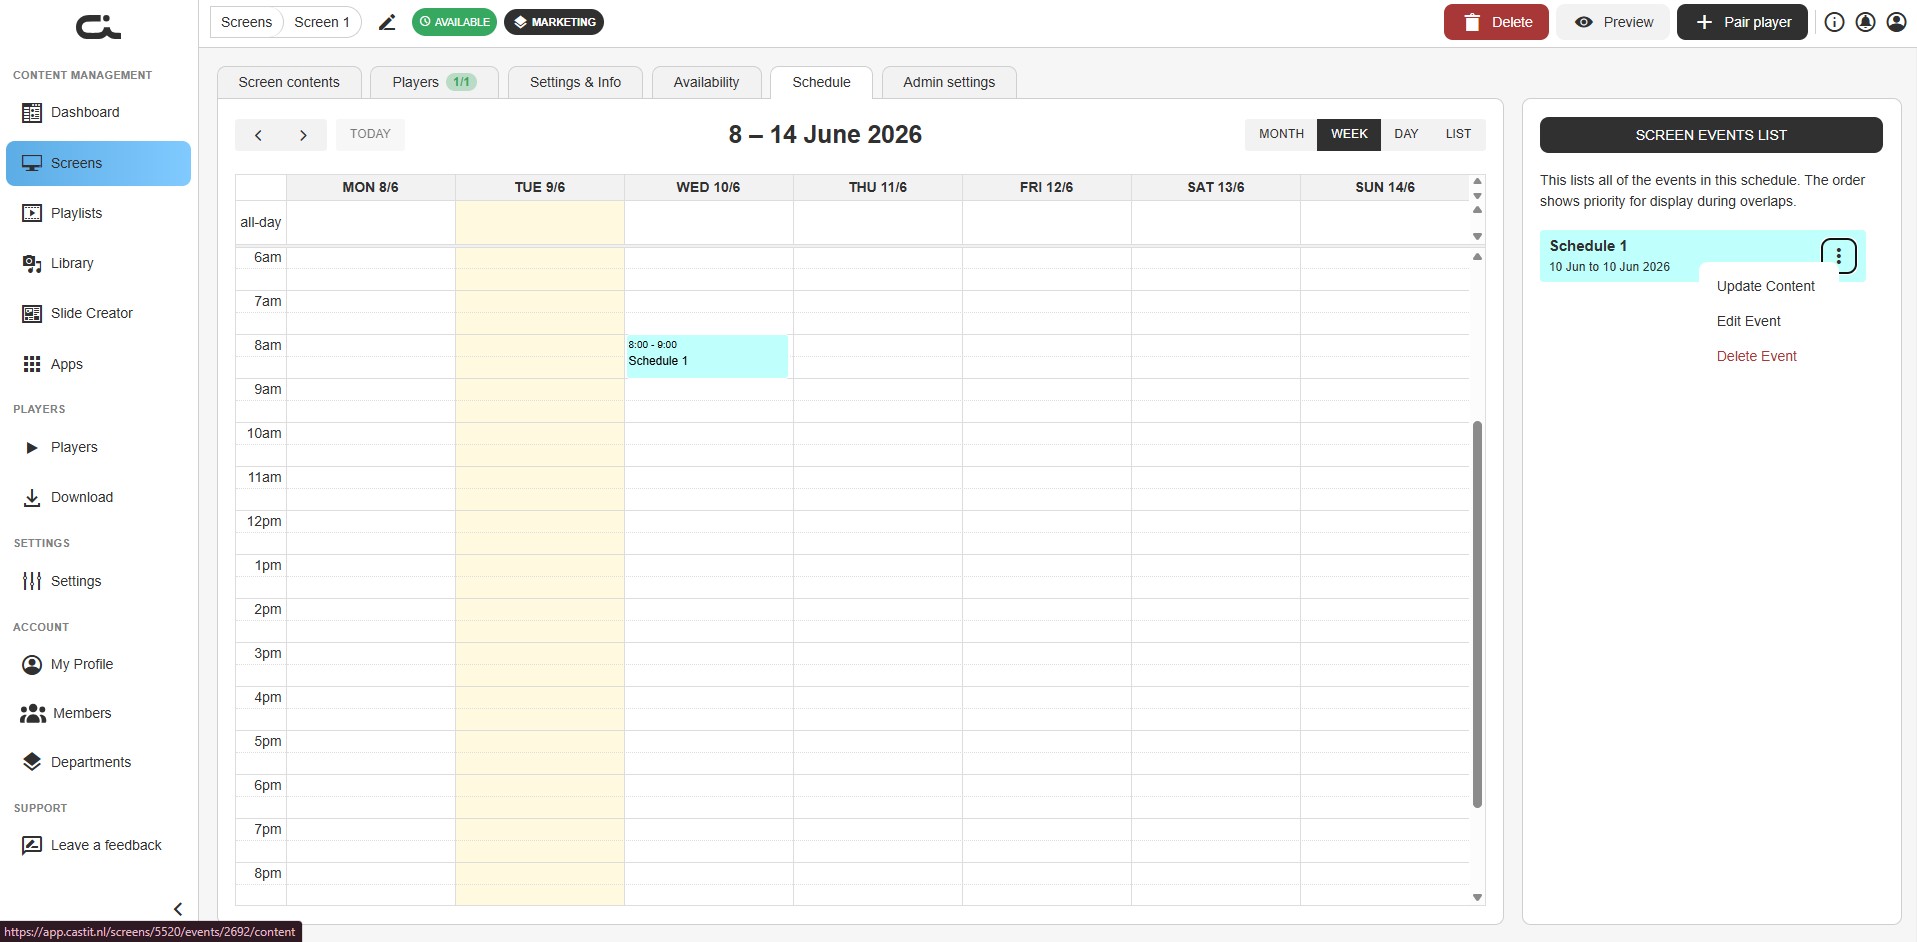
- Each created event, with a ⋮ menu for managing it
- When empty: "This screen has no events yet."
Creating a Schedule
Understanding the Empty State
When first accessing the Schedule tab:
- Calendar shows current week
- No events scheduled
- Message: "This screen has no events yet."
- Clean calendar grid ready for events
Step 1: Create the Event
- Click a time slot in the calendar (click a day/time, or drag across slots) to open the Schedule event dialog
- Fill in the dialog ("Add a new event to your schedule"):
- Schedule name — a name for the event
- Schedule start — a start date and time
- Schedule end — an end date and time
- Click Add event (or Cancel to discard)
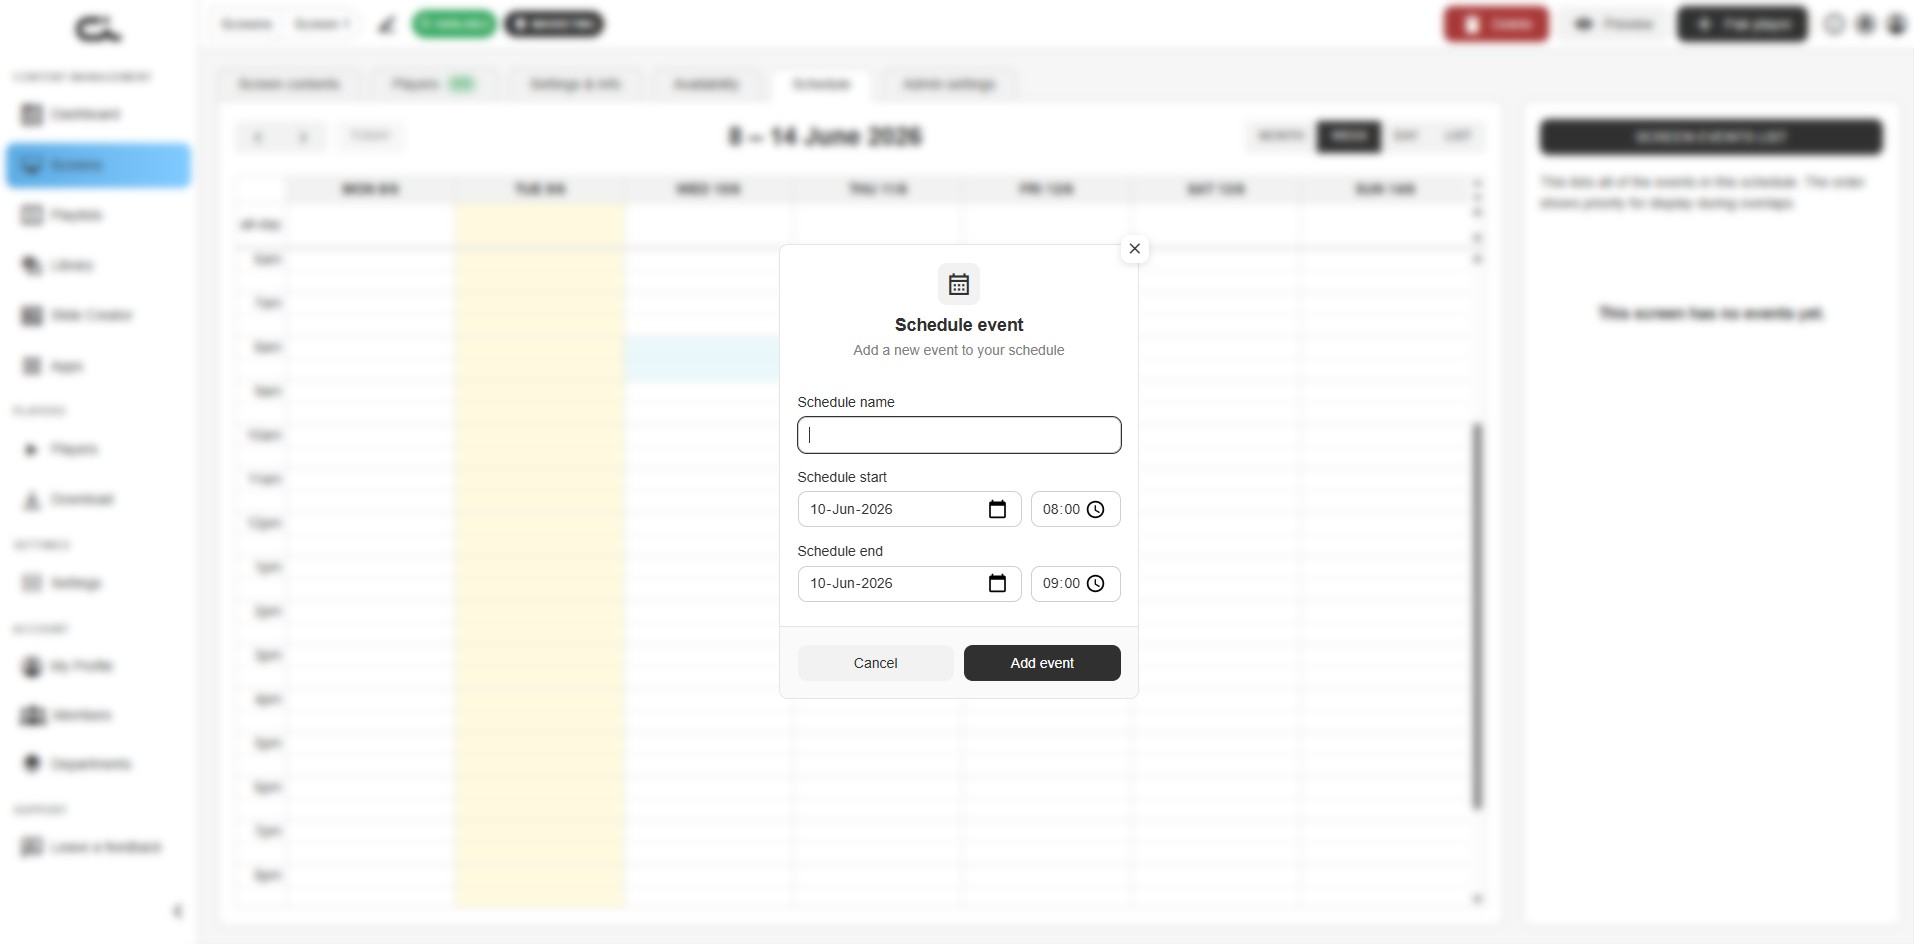
The event then appears as a block on the calendar and as an entry in the Screen Events List.
Step 2: Add Content to the Event
A new event has no content yet — you add it separately:
- In the Screen Events List, open the event's ⋮ menu and choose Update Content (or open the event and use its Event contents tab)
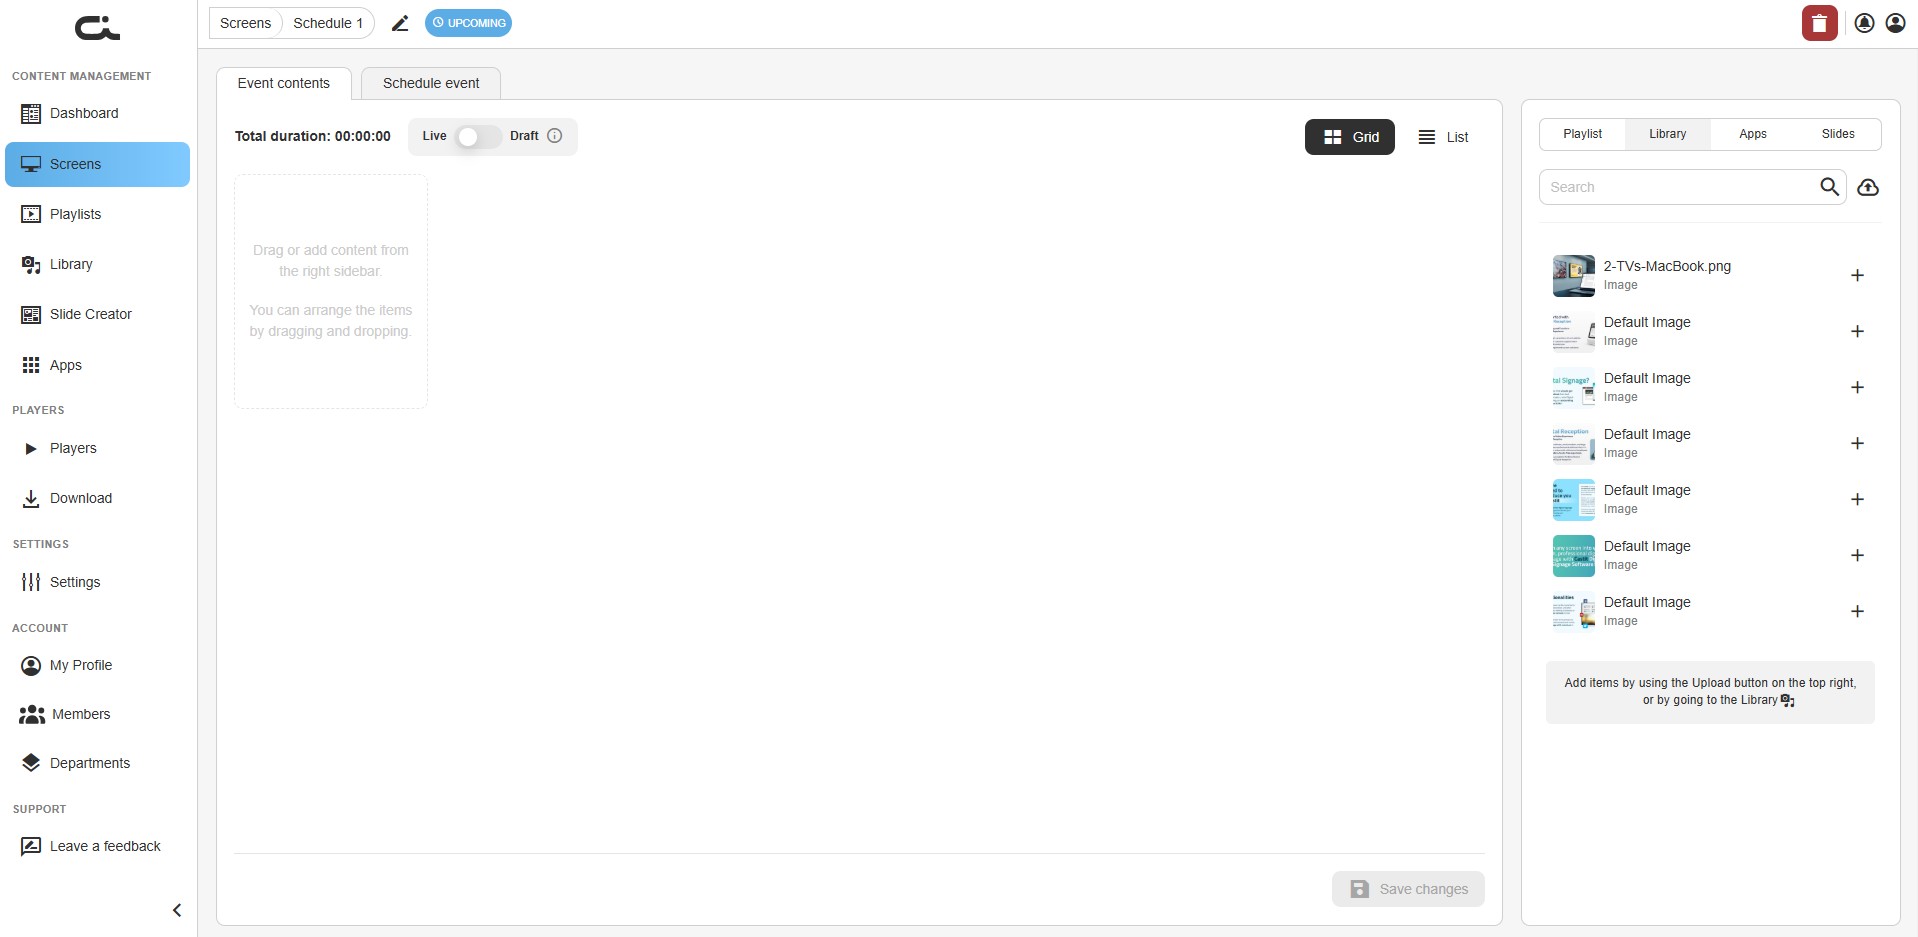
- The event opens to its Event contents tab, which works like the Screen contents tab:
- Total duration, a Live / Draft toggle, and Grid / List views
- A right sidebar with Playlist, Library, Apps, and Slides tabs, a Search box, and an Upload button
- Drag an item into the content area or click its + button
- Click Save changes
The event also has a Schedule event tab where you can adjust its name and start/end times.
Types of Scheduled Content
You can schedule any content from your screen:
Playlists
- Switch between different playlists
- Morning playlist vs. afternoon playlist
- Weekday vs. weekend playlists
Individual Content Items
- Specific images
- Particular videos
- Selected slides
Apps
- Show a Facebook feed during certain hours
- Display a Power BI dashboard during business hours
- Social media content for specific times
Mixed Content
- Combine different content types
- Create complex schedules
- Layer multiple content sources
Schedule Examples
Restaurant Menu Board
Breakfast Hours (6am - 11am):
- Breakfast menu playlist

Lunch Hours (11am - 3pm):
- Lunch menu playlist

Afternoon (3pm - 5pm):
- Snacks and beverages playlist

Dinner Hours (5pm - 10pm):
- Dinner menu playlist

Late Night (10pm - 6am):
- Closed message or special hours message
Office Display
Morning (8am - 12pm):
- Company news and announcements
- Weather and traffic
- Meeting room schedules

Afternoon (12pm - 5pm):
- Department updates
- Project milestones
- Upcoming events

Evening (5pm - 8pm):
- Safety reminders
- Tomorrow's schedule preview
- Motivational content
Retail Store
Weekdays:
9am - 12pm: Morning promotions
12pm - 3pm: Lunchtime deals
3pm - 6pm: Afternoon specials
6pm - 9pm: Evening clearance

Weekends:
All day: Weekend sale content
Event Priority During Overlaps
When multiple events overlap, the order in the Screen Events List determines which content displays:
"The order shows priority for display during overlaps."
Keep this in mind when you schedule events that cover the same time — the event higher in the list takes precedence.
Managing Scheduled Events
Events can be viewed on the calendar (as time-slot blocks) or in the Screen Events List (right panel). Each event in the list has a ⋮ menu with these actions:
Update Content
Opens the event's Event contents tab so you can change what the event displays (see Step 2: Add Content to the Event).
Edit Event
Opens the event's details so you can change its name and start/end date and time.
Delete Event
Removes the event from the schedule. The event disappears from the calendar and the Screen Events List.
Empty Schedule
When no events are scheduled:
- Screen displays default content
- Content from "Screen contents" tab shows
- No automatic changes
- Continuous loop of assigned content
Testing Your Schedule
Before deploying:
- Preview events - Check content appears correctly
- Verify timing - Confirm start/end times are correct
- Test transitions - Ensure smooth content changes
- Check overlaps - Resolve any conflicts
- Monitor first day - Watch schedule execute live
Best Practices
Schedule Planning
- Map your day - Document when content should change
- Consider your audience - When are people present?
- Plan transitions - Allow time for content changes
- Avoid gaps - Ensure continuous content coverage
- Use defaults - Have fallback content for unscheduled times
Content Organization
- Group similar content - Morning content, afternoon content
- Create dedicated playlists - Easier to schedule
- Test content first - Verify before scheduling
- Keep it simple - Start with basic schedules
- Build complexity - Add more events as needed
Maintenance
- Review regularly - Check schedules stay relevant
- Update seasonal content - Change with seasons/holidays
- Monitor execution - Verify schedules work correctly
- Document changes - Keep records of schedule modifications
- Remove old events - Clean up expired schedules
Schedule and Player Syncing
Automatic Updates
- Players sync schedule automatically
- Changes take effect at next sync
- No manual player updates required
- Real-time schedule execution
Sync Timing
- Players check for updates regularly
- New schedules apply immediately
- Content changes at scheduled time
- Network required for syncing
Calendar Navigation Tips
Moving Through Time
- Arrow buttons (< >) - Previous/next period
- TODAY button - Return to current date
- View mode - Switch between month/week/day/list
- Date picker - Jump to specific date
Finding Events
- Scroll through calendar - Browse visually
- Use list view - See all events
- Search (if available) - Find specific events
- Filter by type - Show certain content only
Troubleshooting
Schedule Not Executing
- Check Availability allows screen to be on
- Verify player is connected and online
- Confirm schedule was saved
- Check system time/timezone settings
- Ensure content still exists
Wrong Content Displaying
- Verify event times are correct
- Look for overlapping events (check the order in the Screen Events List)
- Confirm content is assigned to the event (Update Content)
- Review start/end times
Events Not Appearing on Calendar
- Verify events were saved
- Check date range of view
- Switch to list view to see all events
- Look in correct week/month
- Refresh the page
Content Not Changing at Scheduled Time
- Allow a few minutes for sync
- Check player internet connection
- Verify timezone settings match
- Ensure player software is current
- Check for schedule conflicts
Advanced Scheduling
Complex Patterns
Build sophisticated schedules by creating multiple events. Each event is added individually (with its own name, start, end, and content), so you can combine them to cover:
- Multiple events per day
- Different patterns on different days
- Seasonal or holiday content (add events for those dates)
There is no automatic recurrence — to repeat a pattern, create an event for each occurrence.
Integration with Availability
Coordinate scheduling with availability:
- Set availability hours
- Schedule content within those hours
- Plan for downtime
- Manage maintenance windows
Next Steps
After setting up your schedule:
- Creating Playlists - Build content sequences for scheduling
- Screen Settings - Fine-tune display options