Screen Settings and Info
Configure your screen's display properties, add notes, and manage tags.
Accessing Screen Settings
- Navigate to Screens in the left sidebar
- Open your screen
- Click the Settings & Info tab
Settings & Info Overview
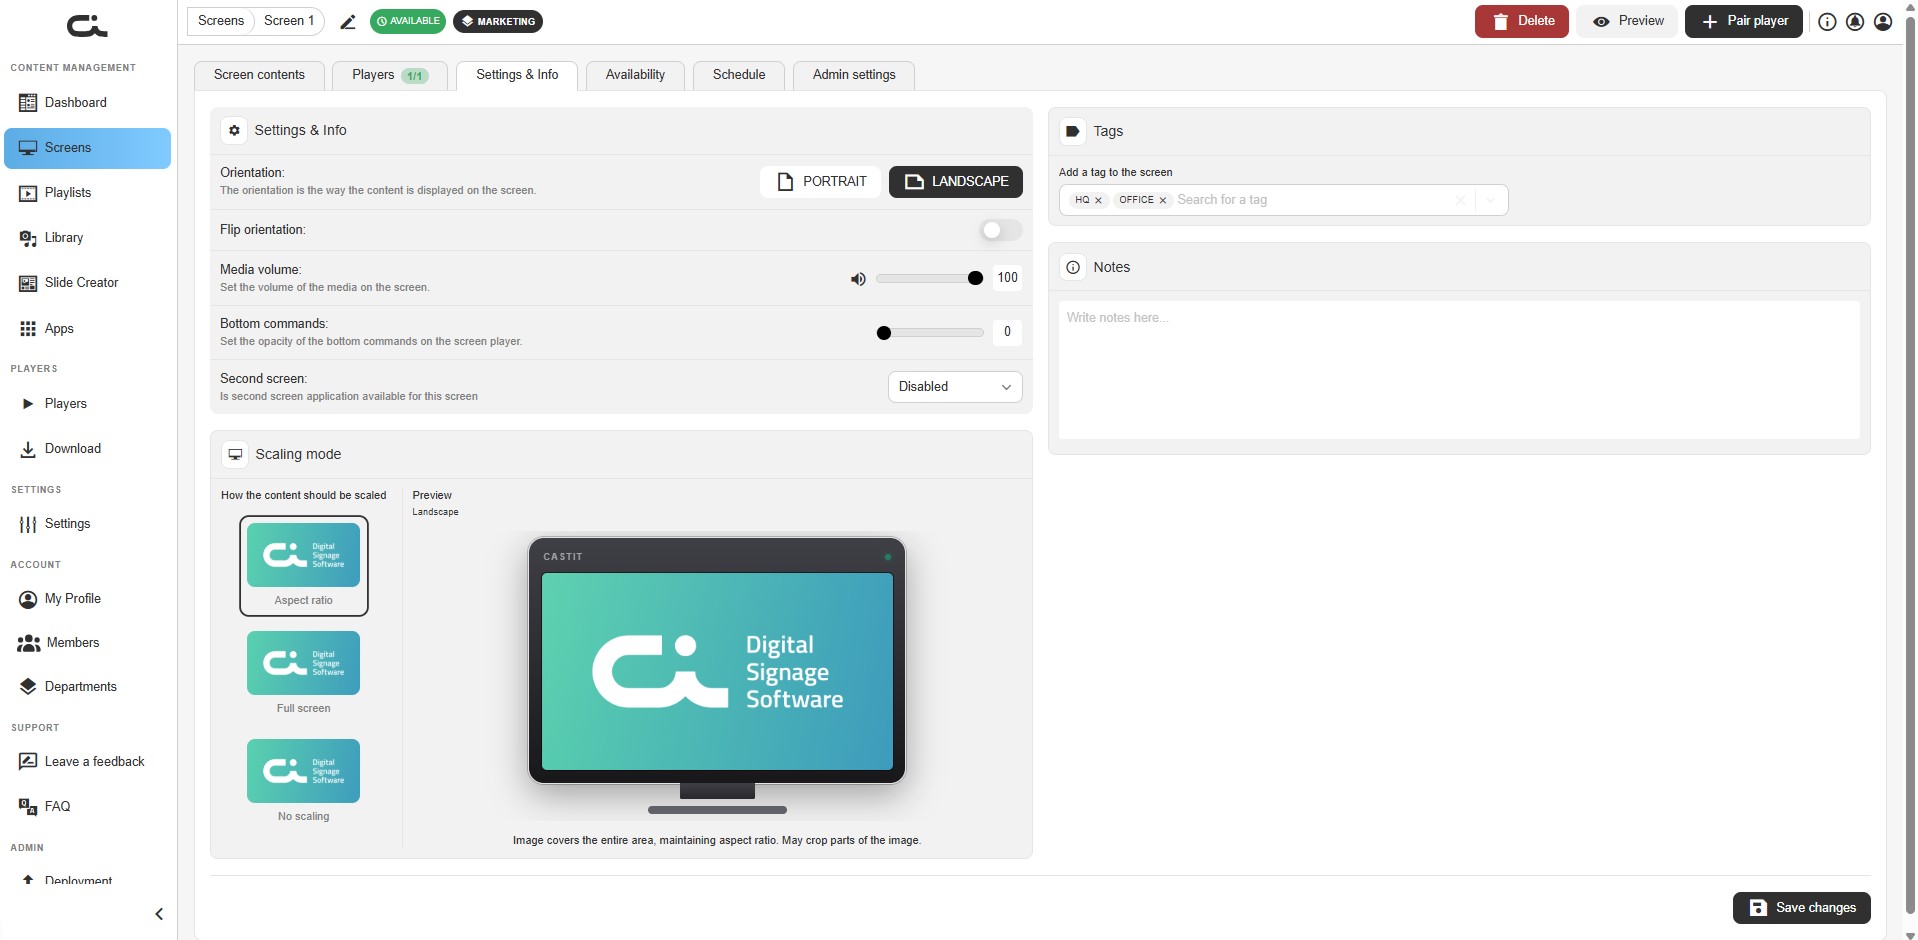
The tab uses a two-column layout:
- Left column:
- Settings & Info panel — Orientation, Flip orientation, Media volume, Bottom commands, and Second screen
- Scaling mode panel — how content is scaled, with a live preview
- Right column:
- Tags panel — add and manage the screen's tags
- Notes panel — internal notes and documentation
Screen Orientation
Control how content is displayed on the screen.
Options
Portrait
- Vertical display orientation
- 9:16 aspect ratio (typical)
- Best for:
- Narrow displays
- Entrance signage
- Directory boards
- Vertical menu boards
Landscape
- Horizontal display orientation
- 16:9 aspect ratio (typical)
- Best for:
- Wide displays
- Standard TVs
- Conference room displays
- Most digital signage
Setting Orientation
- Click the PORTRAIT or LANDSCAPE button
- The selection is highlighted
- Content adjusts to the selected orientation
- Click Save changes
Note: Orientation affects how content is displayed. Ensure your content is designed for the selected orientation.
Flip Orientation
The Flip orientation toggle rotates the content 180° for the selected orientation.
- Toggle directly below Orientation
- Off (default): content displays normally
- On: content is rotated 180° — the Scaling mode preview updates to show this (e.g. "Landscape · Flipped")
Use this when the physical display or player is mounted upside down (for example, a ceiling-mounted or inverted screen).
Media Volume
Control the audio volume for video content and apps that play sound.
Volume Slider
- Range: 0 to 100
- Slider control: Drag to adjust
- Numeric display: Shows current volume percentage
- Speaker icon: Visual indicator
Volume Settings
- 0: Muted (no sound)
- 50: Medium volume
- 100: Maximum volume
Best Practices
- Public spaces: Lower volumes (20-40) to avoid disturbance
- Retail: Moderate volumes (40-60) for background ambiance
- Presentations: Higher volumes (60-80) for clarity
- Quiet zones: Muted or very low (0-20)
Bottom Commands
Control the visibility of on-screen player controls.
Opacity Setting
Set the transparency of bottom commands that appear on the screen player.
- Slider control: Adjust from 0 to 100
- 0: Completely transparent (hidden)
- 100: Fully opaque (visible)
Description
"Set the opacity of the bottom commands on the screen player"
This controls overlays or player controls that may appear on the display, such as:
- Playback controls
- Status indicators
- System notifications
Typical Settings
- 0 (recommended): Hides all controls for clean display
- 50: Semi-transparent controls
- 100: Fully visible controls (useful for troubleshooting)
Second Screen
Configure secondary screen functionality if supported.
Setting
- Dropdown menu: Select second screen configuration
- Default: "Disabled"
Description
"Is second screen application available for this screen"
Use Cases
If your setup supports a second screen:
- Extended displays
- Dual-screen setups
- Companion content
- Multi-monitor configurations
Status
- Disabled: No second screen (default)
- Other options may appear if second screen functionality is available
Scaling Mode
The Scaling mode panel controls how content is fitted to the screen. Under "How the content should be scaled", choose one of three options. A Preview on the right shows the result for the current orientation (and reflects Flip orientation, e.g. "Landscape · Flipped").
Aspect ratio
- Image covers the entire area, maintaining aspect ratio
- May crop parts of the image
- Good default when you want the content to fill the screen without distortion
Full screen
- Image is stretched to fill the entire area
- May distort the image
- Use when filling the screen edge-to-edge matters more than proportions
No scaling
- Image fits within the area, maintaining aspect ratio
- May show empty space (letterboxing/pillarboxing)
- Use when you must show the whole image without cropping or stretching
Setting the Scaling Mode
- Click the Aspect ratio, Full screen, or No scaling card
- The selected card is highlighted and the Preview updates
- Click Save changes
Tags
Organize and categorize your screen with tags.
Add a Tag to the Screen
- Look for the "Add a tag to the screen" section
- View current tags shown as chips (e.g. HQ, OFFICE)
- Click the search/input field: "Search for a tag"
- Type to search existing tags or create new ones
- Select tag(s) to apply
Managing Tags
- Add multiple tags: Screens can have multiple tags
- Remove tags: Click X on tag to remove it
- Create new tags: Type new tag name and create it
- Search tags: Use search to find existing tags
Tag Organization
Use tags to categorize by:
- Location: "Lobby", "Floor-2", "Building-A"
- Department: "Sales", "HR", "Marketing"
- Function: "Menu-Board", "Directory", "Announcements"
- Region: "EMEA", "APAC", "North-America"
- Status: "Active", "Maintenance", "Seasonal"
Notes
Add internal notes and documentation for the screen.
Notes Field
Located on the left side of the Settings & Info tab:
- Large text area: "Write notes here..."
- Free-form text: Add any relevant information
- Private: Notes are internal only, not displayed on screen
- No formatting: Plain text notes
What to Include in Notes
Document useful information such as:
Technical Details
- Display model and serial number
- Player device specifications
- Network configuration
- Installation date
- Hardware notes
Location Details
- Exact physical location
- Mounting information
- Access instructions
- Contact person for location
Content Information
- Content purpose
- Target audience
- Update schedule
- Content approval process
Maintenance
- Last maintenance date
- Known issues
- Scheduled updates
- Support history
Example Note
Screen: Main Lobby Display
Location: Building A, 1st Floor Reception
Display: Samsung 55" Commercial Display
Player: Windows PC (Dell OptiPlex)
Installation: Jan 15, 2024
Content: Company announcements and welcome messages
Maintained by: IT Department
Notes: Display requires restart on first Monday of each month
Contact: facilities@company.com for physical access
Saving Changes
After configuring settings:
- Make your desired changes
- Click the "Save changes" button (bottom-right)
- Changes are applied to the screen
- Paired players update automatically
Settings Summary
Quick reference of all settings:
| Setting | Purpose | Options |
|---|---|---|
| Screen orientation | Display layout | Portrait / Landscape |
| Flip orientation | Rotate content 180° | Toggle (default: off) |
| Media volume | Audio level | 0-100 (slider) |
| Bottom commands | Control opacity | 0-100 (slider) |
| Second screen | Multi-display setup | Dropdown (default: Disabled) |
| Scaling mode | How content is fitted | Aspect ratio / Full screen / No scaling |
| Tags | Organization | Multiple tags |
| Notes | Documentation | Free text |
Best Practices
Configuration Tips
- Set orientation first: Match your physical display
- Use Flip orientation for inverted mounts: Turn it on for ceiling-mounted or upside-down displays
- Pick a scaling mode for your content: Aspect ratio for most cases, Full screen to fill edge-to-edge, No scaling to avoid cropping
- Test volume levels: Check in actual environment
- Hide bottom commands: Use 0 opacity for clean display
- Tag consistently: Use standardized tag system
- Document everything: Keep detailed notes
- Save regularly: Don't lose your changes
Documentation
- Keep notes up to date
- Document all changes
- Include contact information
- Note any issues or quirks
- Record maintenance schedules
Tags Strategy
- Create a tag taxonomy
- Use consistent naming
- Avoid too many tags per screen
- Review and clean up unused tags
- Share tag system with team
Troubleshooting
Settings Not Saving
- Check for error messages
- Ensure you clicked "Save changes"
- Verify you have permissions
- Try refreshing and re-applying
- Contact support if persists
Volume Not Working
- Ensure media has audio
- Check physical display volume
- Verify player audio settings
- Test with different content
- Check player device audio output
Tags Not Appearing
- Refresh the screen list
- Check tag filters
- Verify tags were saved
- Search for the tag specifically
- Recreate tag if necessary
Next Steps
- Screen Availability - Set operating hours
- Scheduling Content - Time-based content
- Creating Screens - Set up additional screens
- Managing Players - Advanced player settings