Creating Screens
Learn how to create and set up digital signage screens in Castit.
What is a Screen?
In Castit, a Screen represents a digital signage display. It's the virtual container that:
- Holds your content (playlists, library items, apps, slides)
- Connects to physical player devices
- Controls what appears on actual displays
- Manages schedules and availability
Creating Your First Screen
Step 1: Navigate to Screens
- Click Screens in the left sidebar
- You'll see the screens list view
If this is your first screen, you'll see:
- "No screens yet" heading
- "Add your first screen to start managing and broadcasting content to your displays."
- "Create a screen" button
Step 2: Open Create Screen Dialog
Click one of these buttons:
- "Create a screen" (center of empty screen list)
- "Create screen" button (top-right corner)
Step 3: Configure Screen Basic Info
The "Create screen" dialog appears ("Create a new screen to display your content.") with three fields:
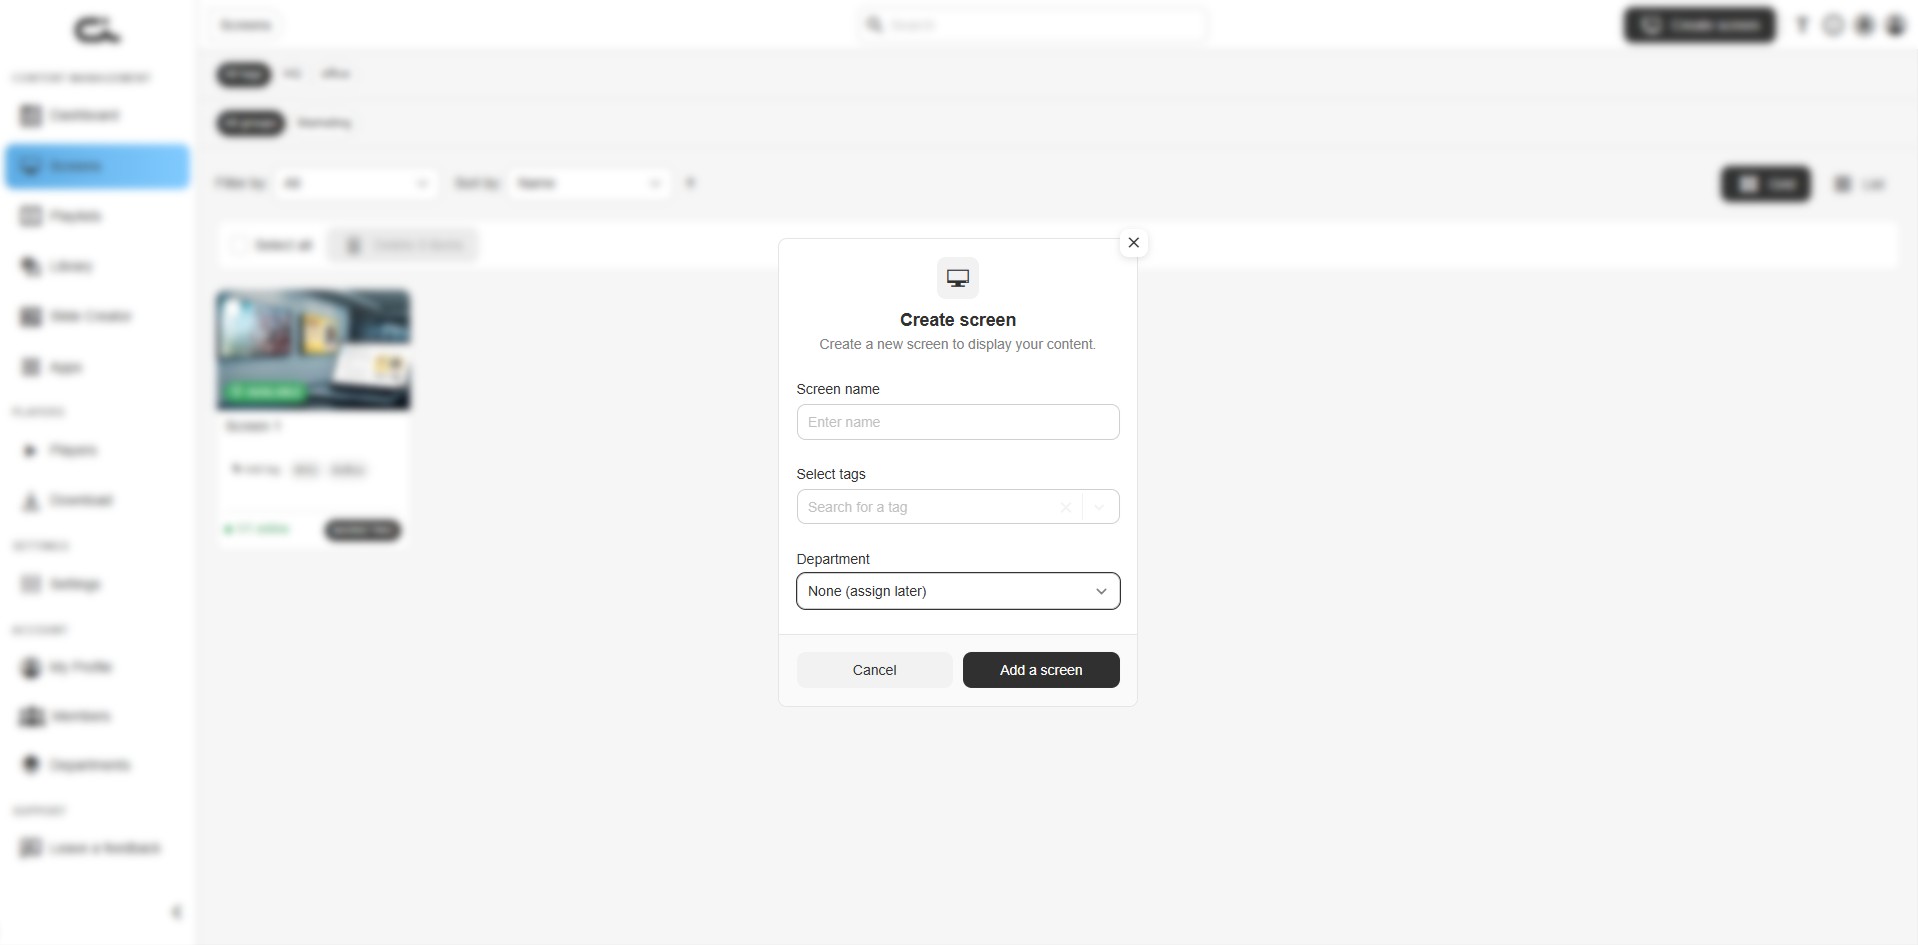
Screen Name
- Required field
- Enter a descriptive name for your screen
- Examples:
- "Reception Display"
- "Main Lobby Screen"
- "Break Room TV"
- "Store Front Window"
Naming Tips:
- Use location-based names
- Include purpose or area
- Keep it clear and searchable
- Avoid generic names like "Screen 1"
Select Tags
- Optional field
- Search and select existing tags ("Search for a tag")
- Tags help organize and filter screens
- You can select multiple tags
- Create tags to categorize by:
- Location (e.g., "Lobby", "Floor 2")
- Department (e.g., "Sales", "HR")
- Purpose (e.g., "Menu Board", "Announcements")
- Region (e.g., "EU", "North America")
Department
- Optional field
- Dropdown defaulting to "None (assign later)"
- If your organization uses the permissions/departments feature, you can assign the screen to a department right here at creation time
- Leave it as None (assign later) to assign it from Account → Departments afterwards
- See Departments and Drafts below for details
Step 4: Create the Screen
- Review your screen name, tags, and department
- Click "Add a screen" button (or "Cancel" to discard)
Your screen is now created and you'll be taken to the screen detail view.
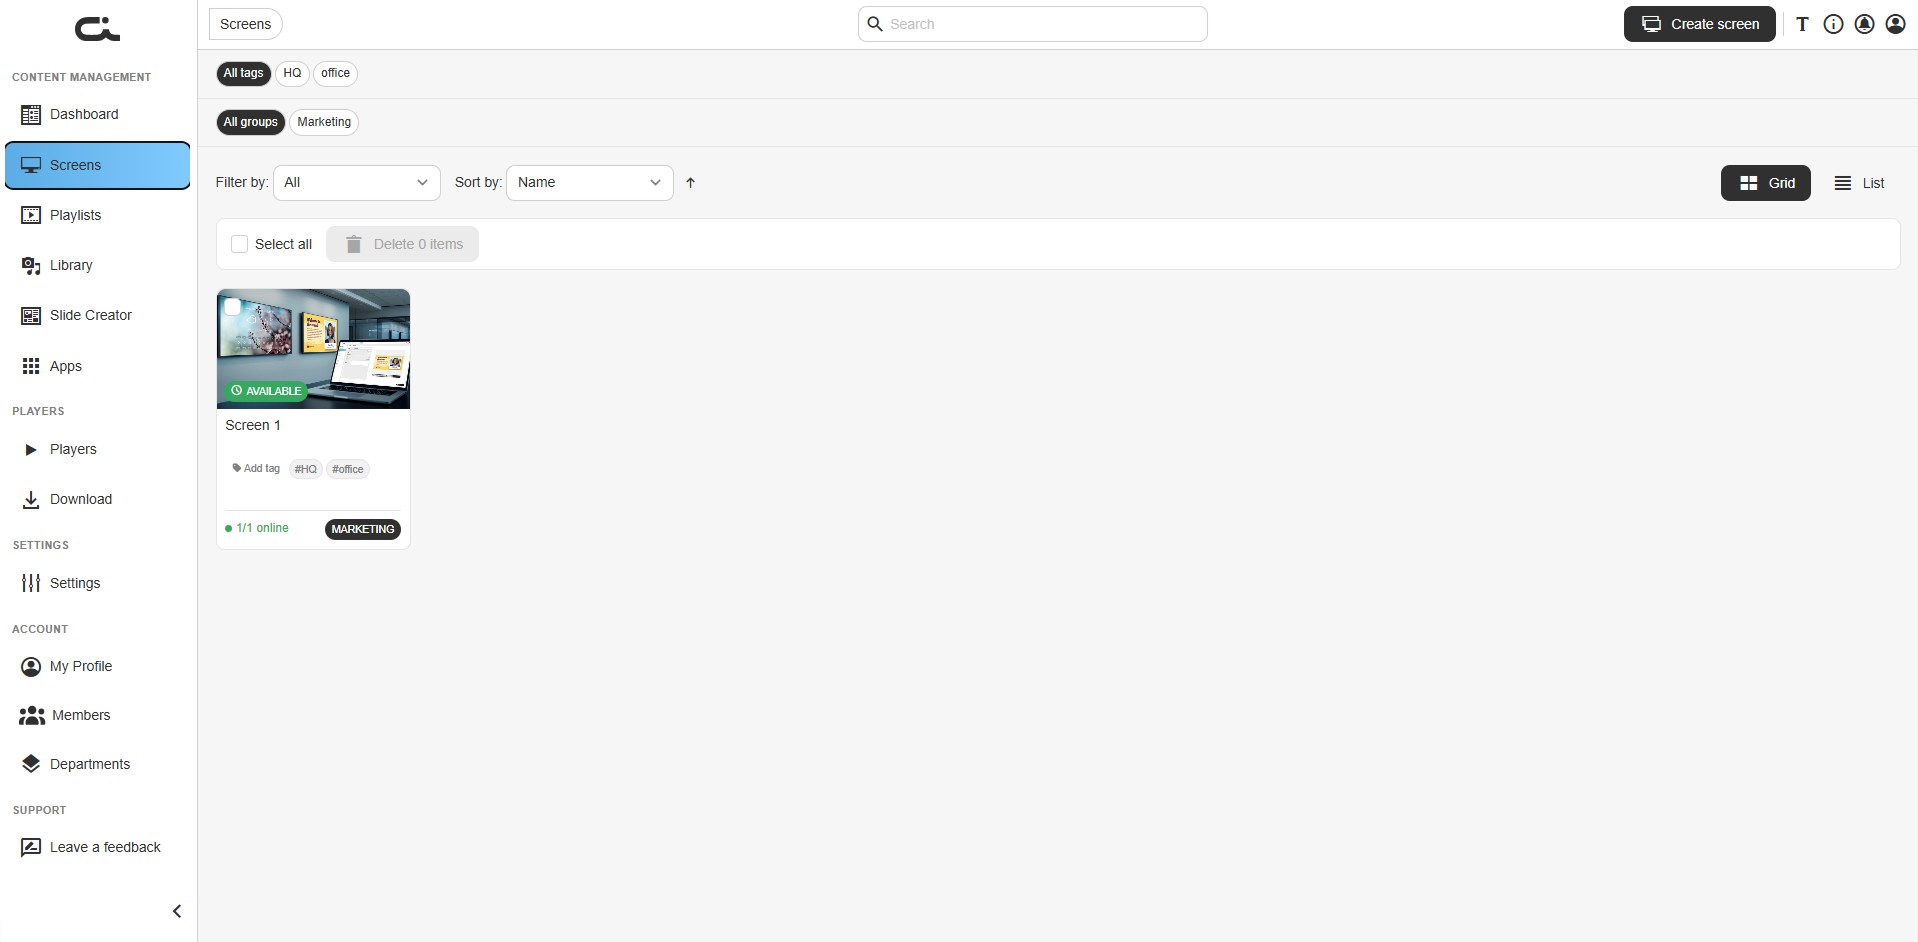
Screen Status
After creation, your new screen will have:
- "AVAILABLE" status indicator (green badge)
- Default empty content area
- Ready to add content and pair players
In the screens list, each screen appears as a card showing:
- The AVAILABLE badge and a content thumbnail
- The screen name
- Its tag chips (e.g.
#HQ,#office) plus an inline Add tag action - A player online count (e.g. "1/1 online")
- Its group/department label (e.g. "MARKETING"), when departments are in use
You can filter the list by the All tags chip row and the All groups chip row at the top, change the Filter by / Sort by options, and switch between Grid and List views.
Departments and Drafts
If your organization has turned on the permissions features, screens behave a little differently:
- Departments — each screen belongs to one department, shown as a department label on the screen card. You can assign a department in the Create screen dialog (the Department field), or leave it as None (assign later) and reassign it from Account → Departments. Members only see screens in their own departments.
- Draft & publish — when approval is required, edits from Members without publishing rights are saved as drafts. A draft label appears on screens with unpublished changes, and a screen keeps showing its current live content until someone with publishing rights clicks Publish.
See Permissions, Departments & Drafts for the full setup.
After Creating a Screen
Once your screen is created, it appears in the screens list, and opening it takes you to the screen detail view.
The detail view header shows the screen name (with an edit pencil to rename it), the AVAILABLE badge, and the group label, plus Delete, Preview, and Pair player buttons.
Below the header are the configuration tabs:
1. Screen Contents
Add and arrange content to display on this screen:
- Add playlists, library items, apps, and slides
- Arrange content order by dragging and dropping
- Set the duration for each item
- See the running Total duration of the screen's content
- Toggle between the Live and Draft versions of the content
- Switch the content area between Grid and List views
- Click Save changes to apply your edits
The right sidebar has tabs for Playlist, Library, Apps, and Slides, a Search box, and an Upload button. Drag an item into the content area, or click its + button to add it.
2. Players
Connect physical player devices to this screen:
- View the players table (name, screen, online status, pairing code, platform, uptime)
- Pair new players using the on-page 3-step setup
- Manage connected players
- Monitor online/offline status
3. Settings & Info
Configure screen properties:
- Screen orientation (Portrait/Landscape)
- Flip orientation
- Media volume
- Bottom commands opacity
- Second screen settings
- Scaling mode (Aspect ratio / Full screen / No scaling)
- Add/edit tags
- Add notes
4. Availability
Control when the screen is active:
- Always available
- Date range
- Custom schedule
5. Schedule
Create time-based content schedules:
- View the calendar in Month, Week, Day, or List view
- Add scheduled events
- Manage content timing and overlap priority
6. Admin settings
Administrative options for the screen. This tab is available depending on your account permissions.
Quick Actions After Creation
Add Content Immediately
-
Stay in the Screen contents tab
-
Use the right sidebar to add content:
- Playlist tab - Add existing playlists
- Library tab - Add media from your library
- Apps tab - Add connected applications
- Slides tab - Add created slides
-
Drag content from the right sidebar to the content area, or click its + button
-
Content appears with a thumbnail and an editable duration
-
Click Save changes when you're done
Pair a Player Device
- Click the Players tab
- Follow the "Pair a player with your screen" setup, which has three steps:
- Download your player — choose Windows, Linux, Android, or Web (or open the full download page)
- Get the pairing code — read the code (and QR) shown on the player
- Enter code and pair — type a Player name and the Pairing code, then click Pair player
- Use the Pair new player button to add additional players
For full details, see Pairing Players.
Managing Multiple Screens
Organizing with Tags
Use tags to organize screens:
- Create consistent tag categories
- Apply tags during screen creation
- Filter screens by tags in the screens list
- Bulk manage screens with same tags
Naming Conventions
Establish naming conventions for your organization:
- Include location: "NYC-Lobby-Screen-1"
- Include function: "Menu-Board-Main"
- Include department: "Sales-Dashboard-1"
- Use consistent separators (hyphens, spaces)
Best Practices
Screen Setup
- Name Clearly: Use descriptive names that identify location and purpose
- Tag Appropriately: Apply relevant tags for easy filtering
- Add Content First: Set up content before pairing players
- Test Before Deployment: Preview content before connecting to physical display
- Document Setup: Use the Notes field in Settings & Info to record details
Content Organization
- Start with essential content
- Arrange items in logical order
- Set appropriate durations
- Preview before publishing
- Keep content library organized
Player Management
- Pair players only after content is ready
- Name players to match their screen
- Monitor player status regularly
- Keep player software updated
Troubleshooting
Can't Create Screen
- Check your account permissions
- Verify you're logged in
- Try refreshing the browser
- Contact support if issue persists
Screen Not Appearing in List
- Check filters and search terms
- Verify status filter includes "All"
- Look for the screen by tag
- Sort list differently
Next Steps
After creating your screen: